How to find and use the accessibility features on Stock Android Smartphone
Accessibility Settings
Finding the Accessibility Menu
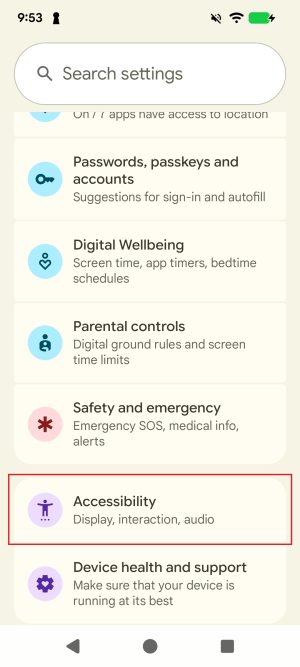
- Open the ‘Settings’ application on your device.

- Select ‘Accessibility’ (you may have to scroll to the bottom of the settings menu to find this option).
Vision-Related
1. Select to Speak
1.1. Enabling Select to Speak
‘Select to Speak’ is a built-in accessibility feature of Android that enables you to select any text and have it read aloud
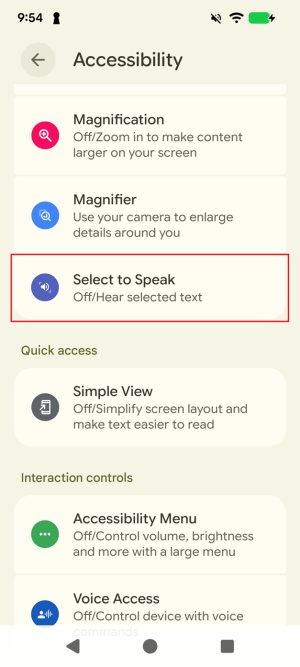
- Tap on the ‘Settings’ application.
- Select the ‘Accessibility’ menu.
- From the ‘Accessibility’ menu under the ‘Display’ heading, select ‘Select to
Speak’.
- Tap on the toggle to enable ‘Select to Speak’ shortcut.
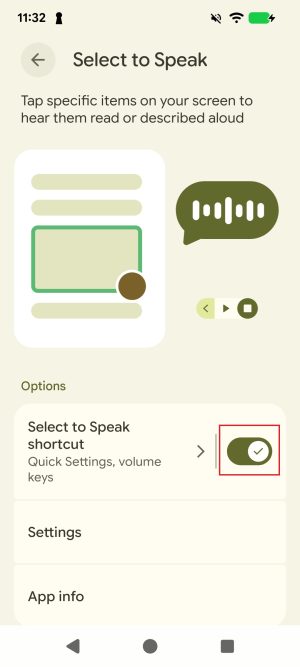
- Note: A prompt may appear asking you to allow Select to Speak to have
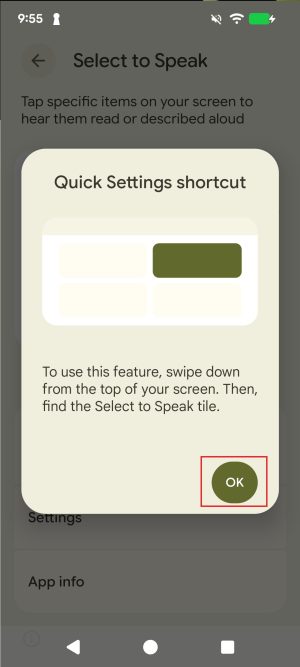
full control of your device; tap ‘Allow’ to proceed. - By default, the Quick Settings setting is enabled for Select to Speak,
which means it will appear in the quick menu that appears when you swipe
down from the top of the screen. A popup may appear informing you of
this; tap ‘Ok’ to proceed.
- Note: A prompt may appear asking you to allow Select to Speak to have
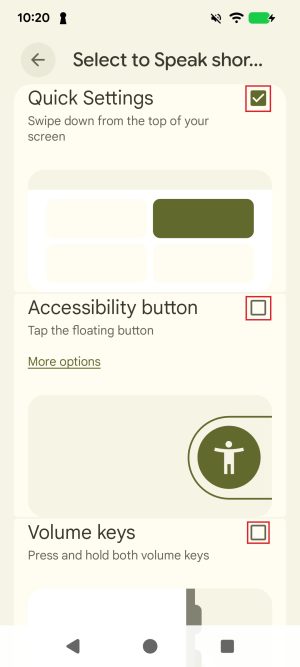
- Tapping the ‘Select to Speak shortcut’ button next to the toggle will open a
screen that allows you to toggle various access methods:- Quick Settings: Access Select to Speak by swiping down
from the top of the screen. - Accessibility Button: A small, moveable button appears
on your screen that you can toggle on or off at any time. - Volume keys: Pressing and holding both volume keys will
activate the feature (or if this setting is enabled for multiple
features, pressing and holding both volume buttons brings up a menu
where you can select the desired feature.)
- Quick Settings: Access Select to Speak by swiping down
- Toggle on any shortcuts you’d like to use.
- Select to Speak has now been enabled. To activate ‘Select to Speak’, perform the shortcut selected and the controls for the screen reader will appear.
1.2. Navigating Select to Speak
Select to Speak can read the screen in multiple ways:
- To read a specific item, such as a word or image, tap on it.
- To read only a portion of the screen, use a single finger to draw a box around the content you wish to have read to you. Select to Speak will read all content in the box.
- Tap the play button to hear everything on the screen.
To close Select to Speak without reading anything, tap the red stop button. Select to Speak will also automatically turn off once it has performed one of the above actions.
When Select to Speak is on screen, you can control the speed of playback or move to the next/previous item. Tap on the arrow to the left of the red circle stop button to expand the controls:
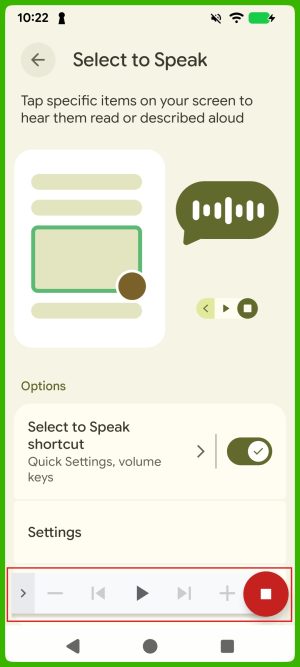
From left to right, these extra controls are:
- Minus: Slows down the speed of the screen reader.
- Rewind: Reads out the previous item on the screen.
- Play/Pause: Reads everything on the screen or pauses playback.
- Forward: Reads out the next item on the screen.
- Plus: Increases the speed of the screen reader
1.3. Text-to-Speech output
The ‘Settings’ menu can be used to change the following settings for Select to Speak:
- Text-to-speech settings: Change the preferred engine, language, speech rate and pitch for text-to-speech output.
- Change reading voice: Change the voice used for speech output from the available voices.
- Read in background: ‘Select to Speak’ will continue reading when you move to other screen or apps.
- Read text on images: Tap on text within photos or the Camera viewfinder to hear the text read aloud.
- Help and Feedback: Search for helpful resources for accessibility features.
- Developer Settings: For debugging only, these settings should be ignored unless you specifically need them.
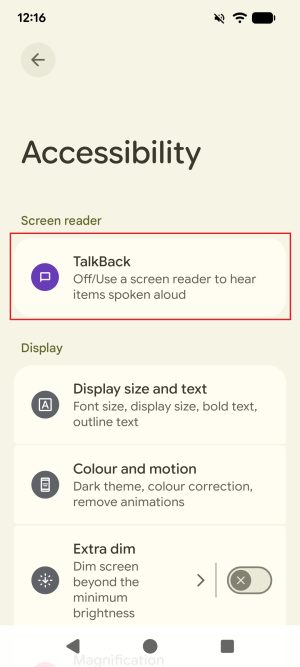
2. TalkBack
TalkBack provides spoken feedback so that you can use your device without looking at the screen.
2.1. Enabling Talkback
- Tap on the ‘Settings’ application.
- Select the ‘Accessibility’ menu.
- From the ‘Accessibility’ menu, under ‘Screen reader’, select ‘Talkback’.
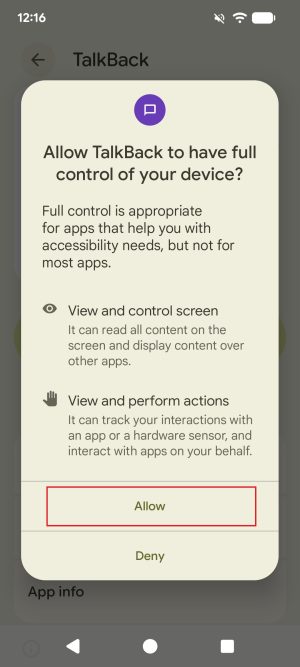
- Tap on the toggle ‘Use TalkBack’.
- Note: A prompt may appear asking to allow TalkBack to have full control of the phone. Tap ‘Allow’ to continue.
- Note: A prompt may appear asking to allow TalkBack to have full control of the phone. Tap ‘Allow’ to continue.
- A new menu will appear taking you through the tutorial for TalkBack. It is highly recommended that you go through this tutorial, as turning off TalkBack can be difficult if you aren’t sure how to navigate with it turned on.
- On the tutorial screens:
- Use two fingers to scroll vertically.
- To activate a control, such as the Next button in the tutorial, tap it with one finger once to select it, then double tap anywhere on the screen to activate the selected control.
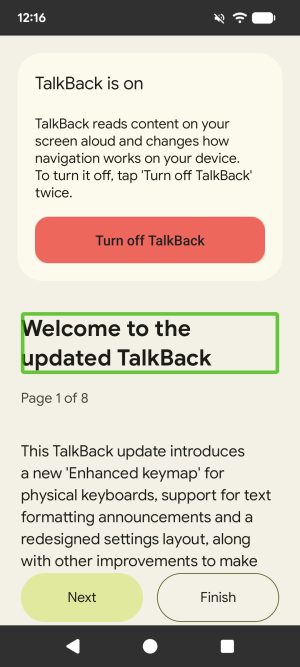
- Once you’re comfortable with the tutorial, activate the ‘Finish’ control, then on the popup that appears activate ‘Finish’ again.
- On the main TalkBack screen, the Talkback Shortcut option can be toggled on if you wish to use a shortcut to access TalkBack. Tap the ‘TalkBack Shortcut’ text to toggle each shortcut on or off.
2.2. Navigating Talkback
- Place a finger on the screen.
- Slowly drag the finger across the screen. As the finger moves, the ‘TalkBack’ screen reader will announce icons, buttons, text, and other items it encounters.
- Pause for a few seconds and ‘TalkBack’ will suggest actions that may be applicable such as replying to a message, opening a link in a new browser and more.
- To engage with something on the screen, tap it once to select it, then double-tap anywhere on the screen to activate it.
2.3. Finger Gestures
Finger gestures allow users to navigate their mobile devices using ‘TalkBack’. For the most part, these gestures are largely customisable, and they can be customised to suit personal preferences by:
- Opening Accessibility settings.
- Finding ‘TalkBack’ then selecting ‘Settings’.
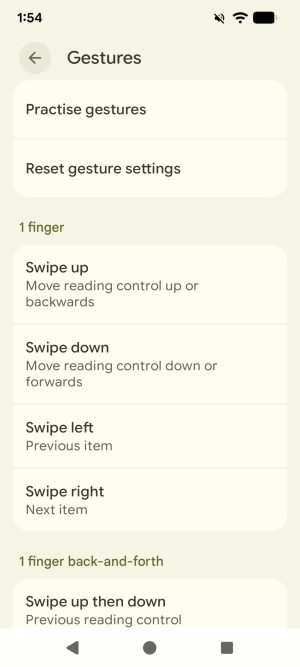
- Under ‘Controls’, select ‘Gestures’.
There may be some gestures that are not customisable, and there may be other gestures that are not assigned to any particular action.
Some versions may have an option to ‘Practise gestures’. Select this option in the ‘Customise gestures’ menu to practise using user-created customisations.
To reset customisations back to the factory defaults, select ‘Reset gesture settings’ and click ‘Reset’ or ‘Confirm’.
A list of common finger gestures is available under the ‘Shortcuts’ section of this instruction guide.
2.4. Other TalkBack Settings
There are other useful settings in the TalkBack settings menu as well. Some important settings are:
- Text to speech: Change the preferred engine, language, speech rate and pitch for text-to-speech output.
- Verbosity: Contains settings for altering how detailed text-to-speech output is. For example, toggling if element types are spoken for focused items or not, or if individual letters should be read out with examples or not.
- Automatic Descriptions: Whether AI generated image descriptions should be provided when an image or icon lacks alternative text.
- Sound and Vibration: Contains controls for how loud accessibility sound output should be.
- Braille: The TalkBack menu contains a Braille section for setting up a Braille keyboard and/or display.
3. Display Settings
3.1. Display size and text
Make the text on screen smaller or larger.
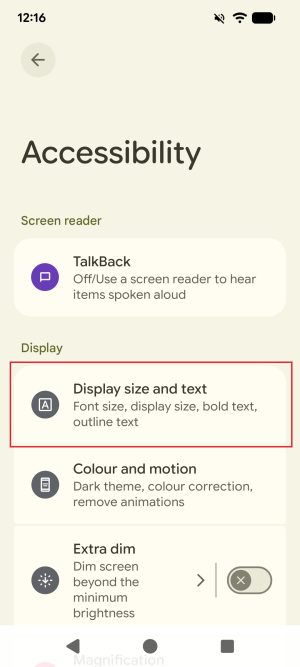
- Tap on the ‘Settings’ application.
- Select the ‘Accessibility’ menu.
- From the ‘Accessibility’ menu under the heading ‘Display’, select ‘Display size and text’.
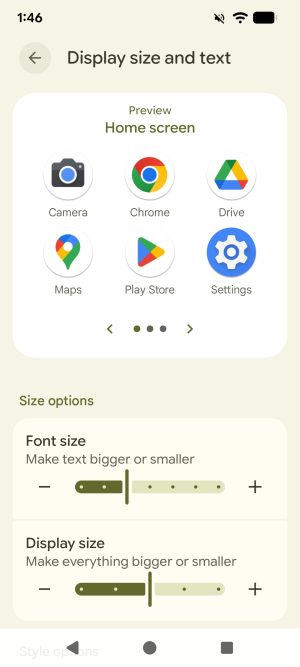
- Customise the display and/or font size by sliding the cursor along the slider bars. Display size acts like a zoom for the whole display, including non-text elements, whereas font size scales text only. Be aware that altering either of these options can cause elements on your screen to move from their usual position.
- The preview at the top of the screen shows what the display and font will look like.
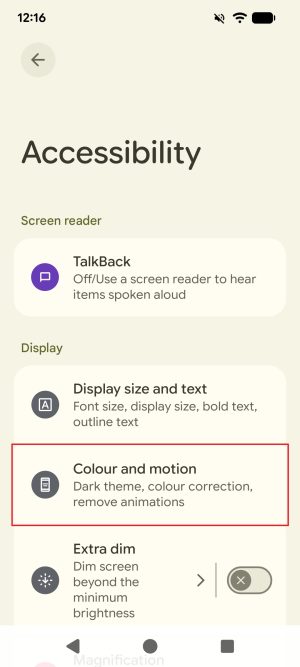
3.2. Dark Theme
Dark mode is a feature that limits the light emitted by phones. In addition to improving battery life, it also helps with readability by applying a dark background to all apps and screens. This feature may be of assistance, especially for the visually impaired.
- Tap on the ‘Settings’ application.
- Select the ‘Accessibility’ menu.
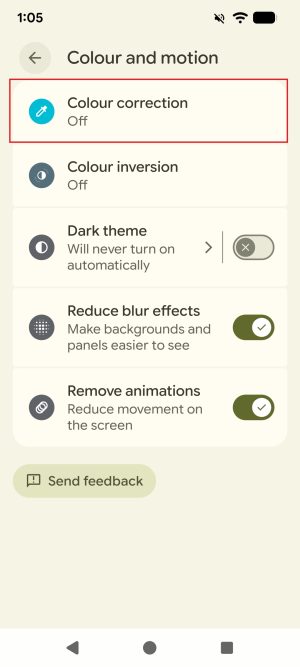
- From the ‘Accessibility’ menu under ‘Display’, select ‘Colour and motion’.

- From the Colour and motion menu, there is a toggle for Dark theme. Tapping the text to the left will open Dark Theme settings, including using it for unsupported apps and setting schedules for automatically enabling/disabling Dark Theme.
- Once enabled, the dark theme should now be applied to the phone in all apps that support it.
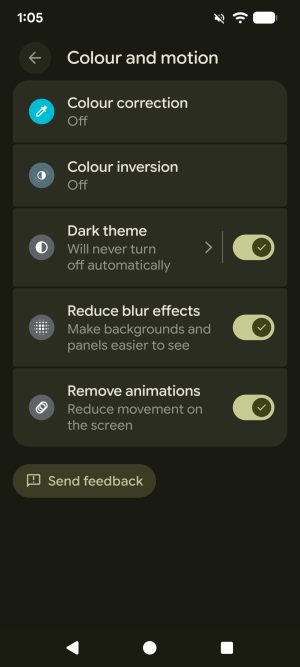
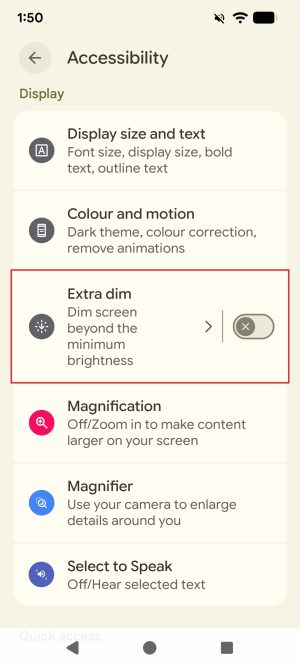
- Additionally, in the Accessibility menu under ‘Display’, there is also a toggle for ‘Extra dim’ mode if you would like to reduce screen brightness further than the default brightness settings allow.
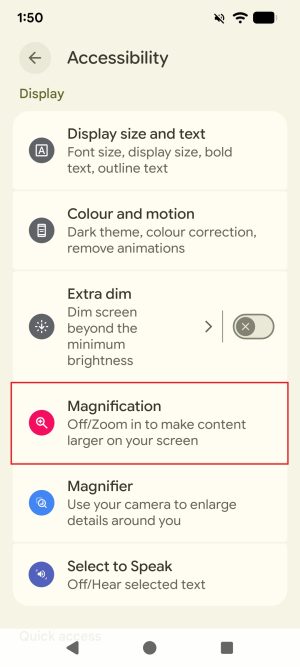
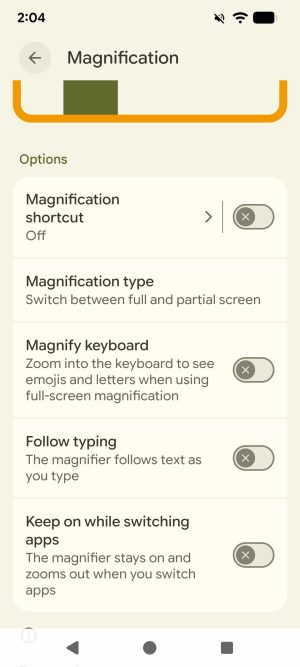
3.4. Magnification
Zoom in quickly on the screen to display content more clearly.
- Tap on the ‘Settings’ application.
- Select the ‘Accessibility’ menu.
- From the ‘Accessibility’ menu, under ‘Display’, select ‘Magnification’.
- There is a toggle for enabling/disabling magnification.
- One or more shortcuts can be set by tapping the text ‘Magnification shortcut’ to the left of the toggle.
- Magnification has an extra shortcut option under the ‘Advanced’ tab, which allows you to triple tap to toggle magnification. Note this may slow down your device.
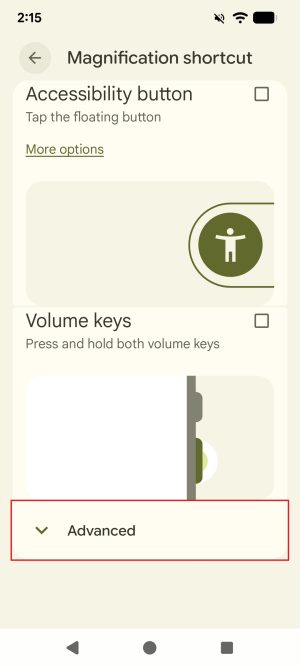
- Magnification has an extra shortcut option under the ‘Advanced’ tab, which allows you to triple tap to toggle magnification. Note this may slow down your device.
- Recent versions of Android may have several options below the magnification toggle that allow you to customise how the magnifier works. Explore these options and choose what best suits your individual needs. We recommend leaving ‘Magnification type’ set to ‘Switch between full and partial screen’, as this allows you to access both types of magnification interchangeably.
- Once Magnifier is enabled, it is used as follows:
Note: These instructions assume that the magnification type is set to the default ‘Switch between full and partial screen’.- To zoom in:
- Use shortcut to start magnification.
- Tap the screen.
- Drag 2 fingers to move around screen – in partial zoom mode, use 2 fingers or the orange handle in one of the bottom left corners to move the zoom box.
- Pinch with 2 fingers to adjust zoom.
- Use shortcut to stop magnification.
- To zoom in temporarily (note: this only works in full screen zoom mode):
- Use shortcut to start magnification.
- Touch and hold anywhere on the screen.
- Drag finger to move around screen.
- Lift finger to stop magnification.
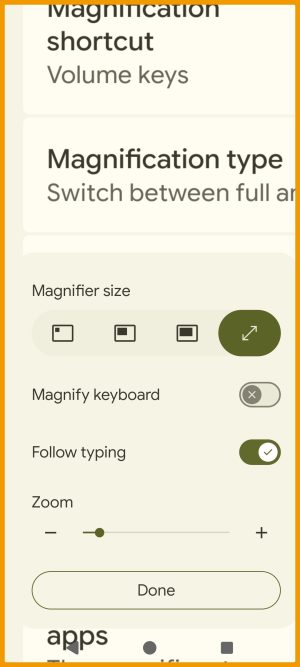
- To change how zoom behaves:
- If you are in full screen mode (the default starting mode), tap the gear icon to open the quick settings.
- If you are in partial zoom mode, there is an orange handle in one of the bottom corners of the zoom box that can be dragged to move the zoom window. Tap this to open the quick settings.
- The top row allows you to swap between 3 different partial zoom box sizes as well as full screen zoom.
- ‘Magnify keyboard’ toggles if magnification should affect the keyboard or not.
- ‘Follow typing’ toggles if the magnifier should follow where your cursor is while typing.
- The bottom slider adjusts the zoom level.
- To zoom in:
3.5. Colour Correction
Colour correction allows you to adjust how colours are displayed on your device.
- Tap on the ‘Settings’ application.
- Select the ‘Accessibility’ menu.
- From the ‘Accessibility’ menu, under ‘Display’, select ‘Colour and motion’.
- From the ‘Colour and motion’ menu, tap ‘Colour correction’.
- The list of colours at the top of this screen will show you how each colour will be displayed on your phone based on your current settings.

- To enable colour correction, tap the ‘Use colour correction’ toggle.
- Below this toggle, there are several different modes available, as well as a slider for adjusting the intensity of the correction.
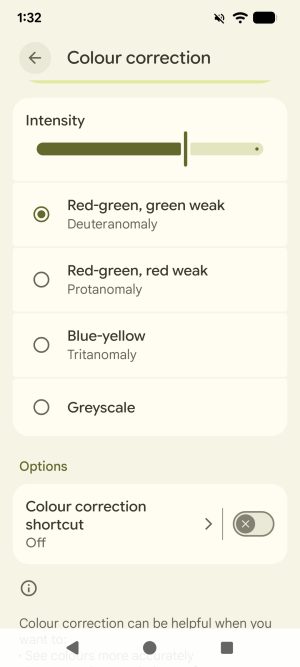
- At the bottom of this screen, shortcuts can also be set and toggled under the ‘Options’ heading.
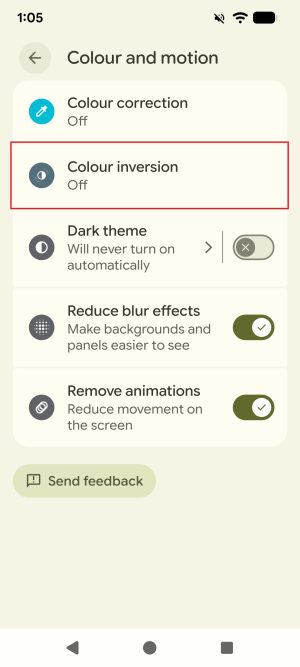
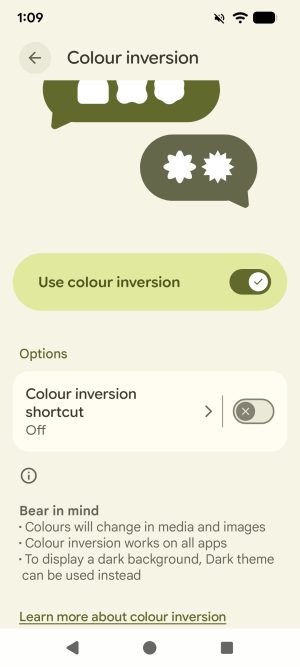
3.6. Colour Inversion
Colour inversion turns light screens dark.
- Tap on the ‘Settings’ application.
- Select the ‘Accessibility’ menu.
- From the ‘Accessibility’ menu, under ‘Display’, select ‘Colour and motion’.
- From the ‘Colour and motion’ menu, tap on ‘Colour inversion’.
- To enable colour inversion, tap the toggle ‘Use colour inversion’.
- To enable a shortcut for toggling colour inversion, tap ‘Colour inversion shortcut’ and choose one or more shortcut options.
3.7. Large Mouse Pointer
‘Large mouse pointer’ option can be used to enlarge the cursor.
Note: A mouse needs to be connected to the device before using this feature.
- Tap on the ‘Settings’ application.
- Select the ‘Accessibility’ menu.
- From the ‘Accessibility’ menu, select the toggle for ‘Large mouse pointer’.

- If a mouse is already connected to your phone, the cursor should now be enlarged.

3.8. Remove Animations
Disables animations make it easier on the eyes for people sensitive to visual effects.
- Tap on the ‘Settings’ application.
- Select the ‘Accessibility’ menu.
- From the ‘Accessibility’ menu, under ‘Display’, select ‘Colour and motion’.
- From the ‘Colour and motion’ menu, tap the toggle for ‘Reduce animations’.
- Animations such as opening and minimising apps have now been removed.
- There is also a toggle on the same page called ‘Reduce blur effects’. This will remove blurs such as the one behind the quick settings panel, giving these areas a solid colour instead, which may also improve readability and reduce eyestrain.
Hearing-Related
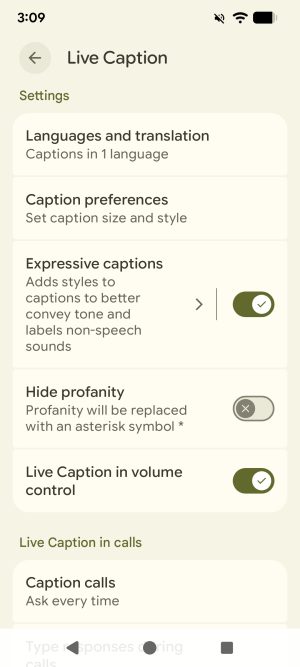
1. Live caption
Automatically adds captions to any videos or audio playing on your phone
- Tap on the ‘Settings’ application.
- Select the ‘Accessibility’ menu.
- From the ‘Accessibility’ menu, under ‘Captions’, select ‘Live caption’.
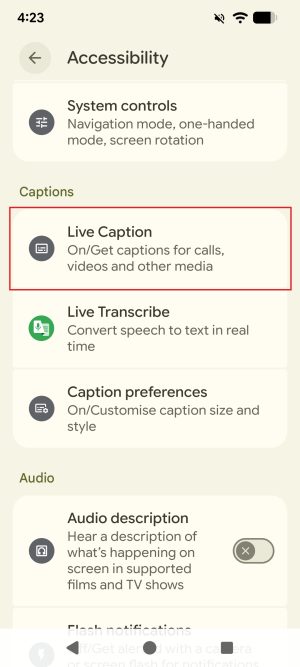
- Tap on ‘Use Live Caption’ to use this feature.
- Under the toggle, there are several options:
- Language and translation: This menu is only populated if you have more than one system language installed.
- Caption preferences: Allows you to change caption size and style.
- Expressive captions: A toggle for expressive captions. Touching the text to the left of the toggle allows you to adjust settings such as formatting to convey tone, showing sound labels, and showing speech emotion and emphasis.
- Hide profanity: Toggles whether or not profanity is replaced with asterisk symbols.
- Live Caption in volume control: Adds a toggle for Live Captions in the volume control menu.
- Live caption in calls: Use live captions during calls and related settings.
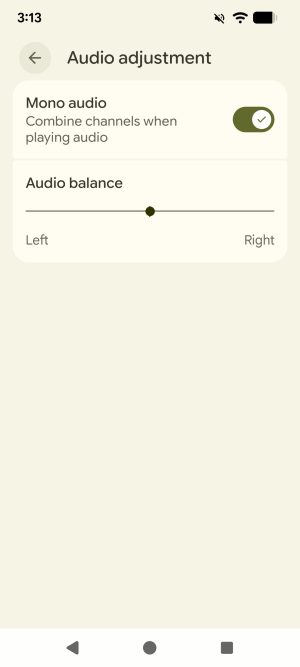
2. Mono audio and Audio Balance
Mono audio merges and sends the same sound to both the left and right speaker or earbuds for listening with one ear. Audio balance changes the level of output from the left and right speakers in a stereo or two-channel sound system.
- Tap on the ‘Settings’ application.
- Select the ‘Accessibility’ menu.
- From the ‘Accessibility’ menu, under ‘Audio’, select ‘Audio adjustment’.

- In the Audio Adjustment menu, you can toggle ‘Mono audio’ on or off, and change the left-right balance of the audio output.
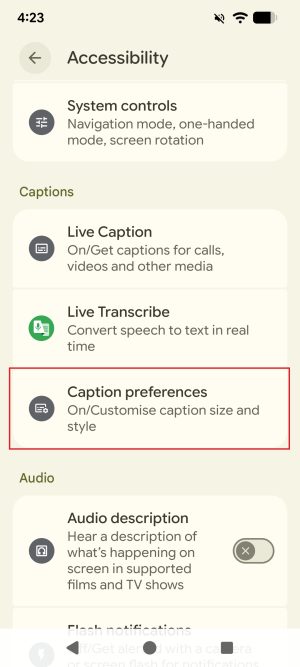
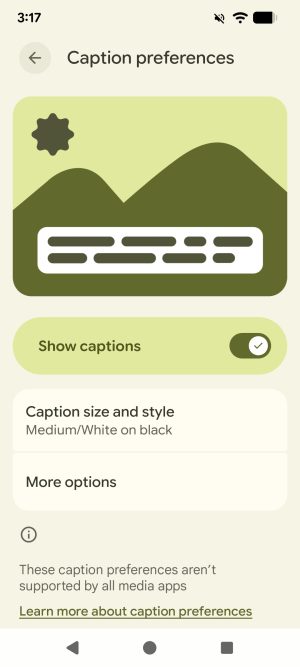
3. Caption preferences
Change settings for non-live captions. Note that not all applications support these caption preferences.
- Tap on the ‘Settings’ application.
- Select the ‘Accessibility’ menu.
- From the ‘Accessibility’ menu, under ‘Captions’, select ‘Caption preferences’.
- Tap on the toggle for ‘Show captions’ to enable captions.
- From the menu above, you can also change the following settings:
-
- Caption size and style: Change the size of captions from very small to very large and colour preference of captions.
- More options: Change language settings for captions.
General and Mobility-Related
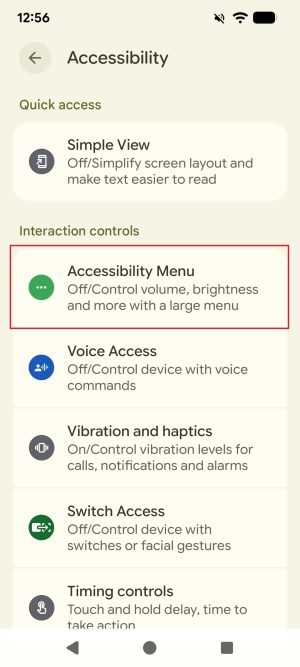
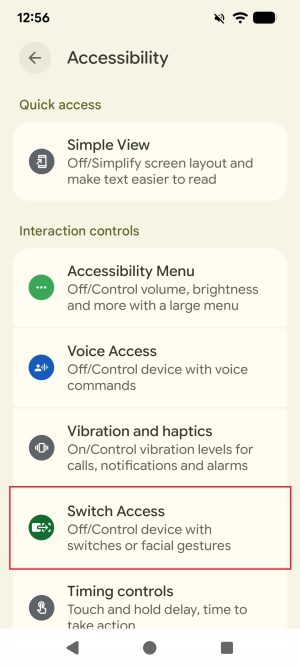
1. Accessibility Menu
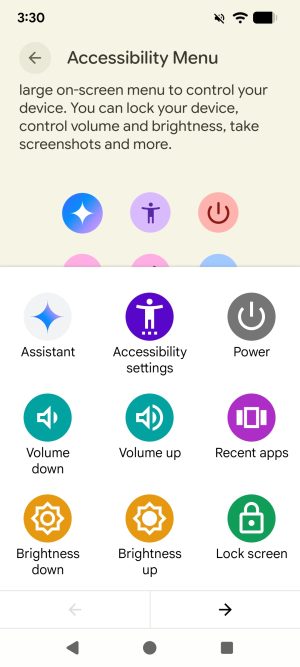
The Accessibility Menu provides a large on-screen menu to control certain key features your phone. You can lock your phone, control volume and brightness, take screenshots and more.
- Tap on the ‘Settings’ application.
- Select the ‘Accessibility’ menu.
- From the ‘Accessibility’ menu, under ‘Interaction controls’ select ‘Accessibility Menu’.
- Tap on the toggle to enable the Accessibility menu.
Note: A prompt may appear asking you to allow the ‘Accessibility Menu’ to have full control of your device. Tap ‘Allow’ to proceed.
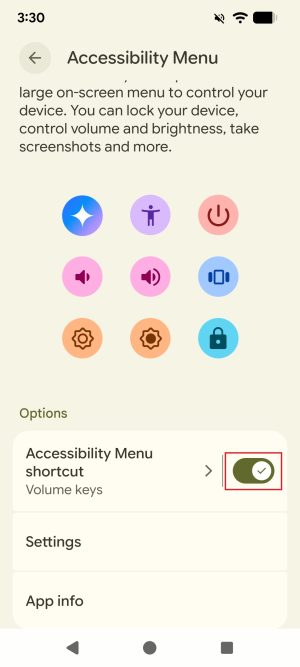
- To choose a shortcut for opening the Accessibility menu, tap on the text ‘Accessibility Menu shortcut’ next to the toggle.
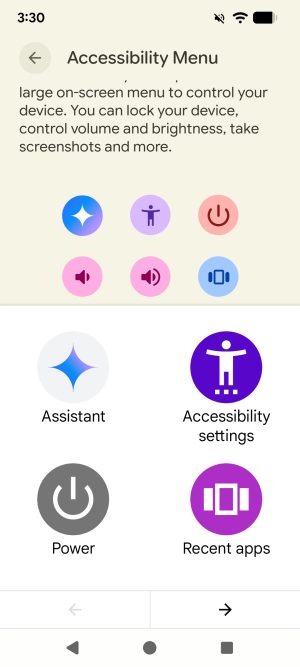
- Under the ‘Setting’ button, you can toggle large buttons on or off or get help for using the Accessibility Menu.
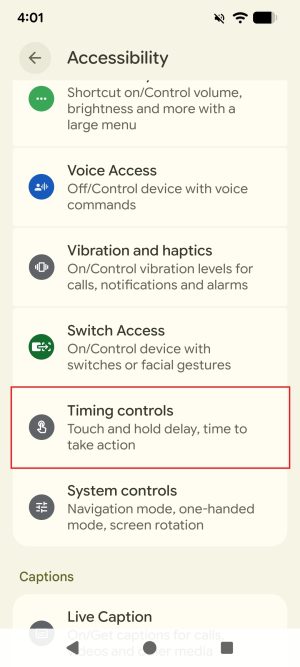
2. Switch Access
‘Switch access’ lets you interact with your Android device using one or more switches instead of the touchscreen. ‘Switch Access’ can be helpful if you can’t interact directly with your device. Use switches to select items, scroll, type and more.
- Tap on the ‘Settings’ application.
- Select the ‘Accessibility’ menu.
- From the ‘Accessibility’ menu, under ‘Interaction controls’, select ‘Switch Access’.
- Tap on the ‘Use Switch access’ toggle to enable the feature.
Note: A prompt may appear asking you to allow ‘Switch access’ to have full control of your device. Tap ‘Allow’ to proceed. - A new window will appear to take you through the Switch Access Setup Guide. Choose a switch type, then tap ‘Next and follow the on-screen instructions to set up your external switch.

- To set up a shortcut for ‘Switch Access’, tap ‘Switch Access shortcut’ and choose one or more shortcut options.
Note: Another prompt may appear asking you to allow ‘Switch access’ to have full control of your device. Tap ‘Allow’ to proceed. - Feel free to explore more advanced audio and control settings by selecting ‘Settings’ from the ‘Switch access’ menu.
4. Power Button Ends Call
Enables the power button to end a call when pressed.
- Tap on the ‘Settings’ application.
- Select the ‘Accessibility’ menu.
- From the ‘Accessibility’ menu, under ‘Interaction controls’, tap ‘System controls’.

- Toggle ‘Power button ends call’ on.
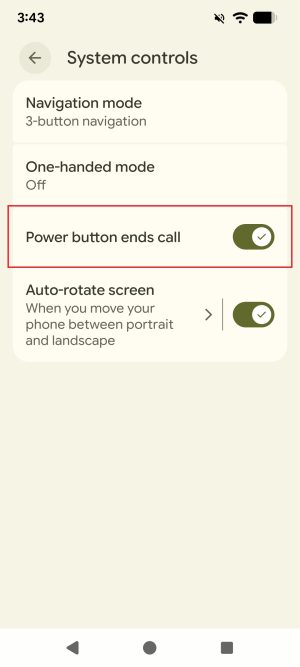
- When in a call, the power button can now be used to end the call.
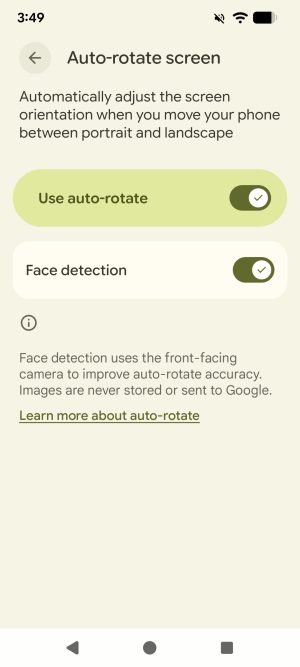
5. Auto-rotate Screen
Allows your device’s screen orientation to automatically adjust.
- Tap on the ‘Settings’ application.
- Select the ‘Accessibility’ menu.
- From the ‘Accessibility’ menu, under ‘Interaction controls’, tap ‘System controls’.
- On this screen you can toggle screen auto-rotation on or off.
- Tapping on the text to the left of the toggle opens auto-rotate settings.
- The “face detection” toggle controls whether or not auto rotation should account for the rotation of your face (e.g. if you are lying on your side, keeping the screen in vertical orientation even if you’re holding it parallel to the floor).
- When using certain applications, the device should now automatically rotate depending on how you are holding your device.
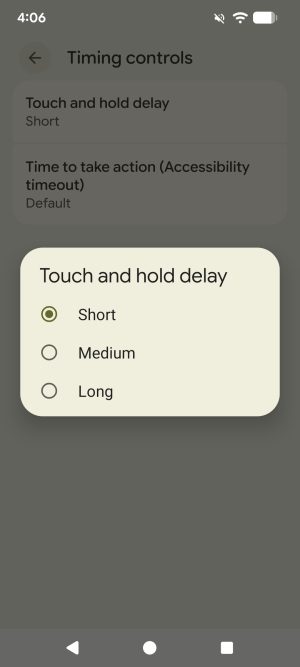
6. Touch and Hold Delay
Allows you to set the recognition time for tapping and holding the screen. Applications sometimes require you to press your finger on the screen and hold it to trigger another action.
- Tap on the ‘Settings’ application.
- Select the ‘Accessibility’ menu.
- From the ‘Accessibility’ menu, under ‘Interaction controls’, select ‘Timing controls’.
- Tap ‘Touch and hold delay’.
- In the popup window that opens, select your preferred touch and hold delay. The default is ‘Short’.
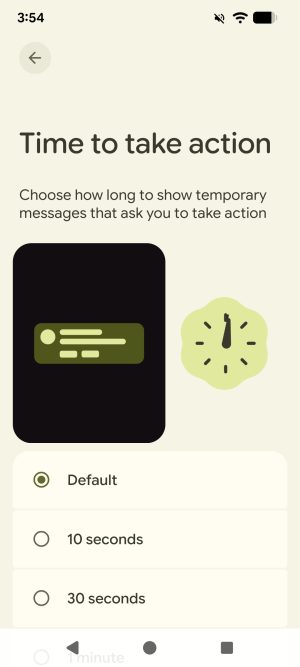
7. Time to Take Action (Accessibility Timeout)
Choose for how long to show messages that ask you to take action but are only visible temporarily. Not all applications support this setting.
- Tap on the ‘Settings’ application.
- Select the ‘Accessibility’ menu.
- From the ‘Accessibility’ menu, under ‘Interaction controls’, select ‘Timing controls’.
- Tap ‘Time to take action (Accessibility timeout)’.
- Choose your preferred value for the ‘Time to take action’, which is how long in seconds to show temporary messages that ask you to take action.
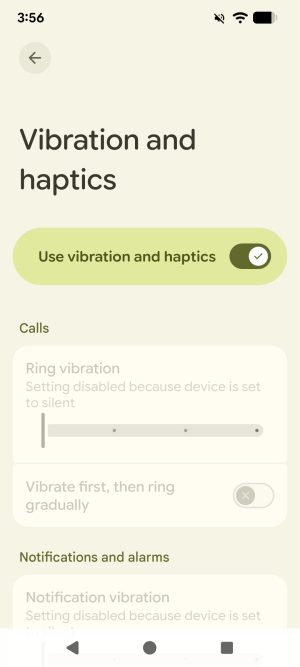
8. Vibration and Haptics
Allows you to enable or disable vibration and touch feedback.
- Tap on the ‘Settings’ application.
- Select the ‘Accessibility’ menu.
- From the ‘Accessibility’ menu, under ‘Interaction controls’, select ‘Vibration and haptics’.

- Go through this menu to adjust the vibration and haptics for different types of content. Note that some settings require the ‘Use vibration and haptics’ toggle to be enabled.
9. System controls
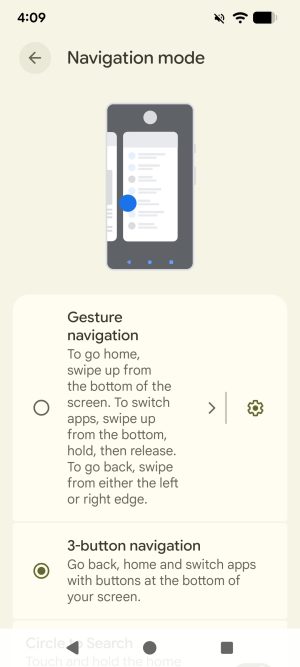
Allows you to choose between different navigation modes for your device.
- Tap on the ‘Settings’ application.
- Select the ‘Accessibility’ menu.
- From the ‘Accessibility’ menu, under ‘Interaction controls’, select ‘System controls’.
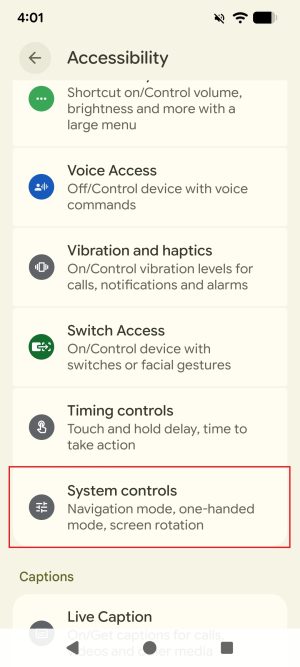
- Tap ‘Navigation mode’.
- Choose between either the ‘Gesture navigation’ or the ‘3-button navigation’.
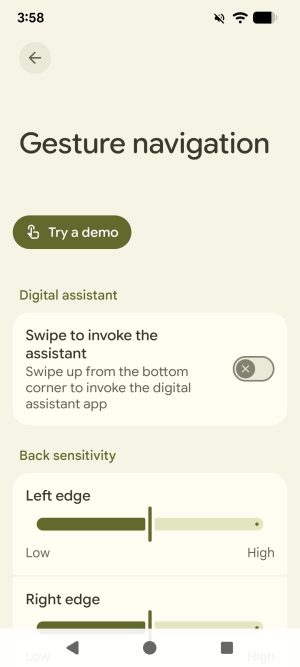
- Tap the gear icon next to ‘Gesture navigation’ to access the settings for Gesture mode. In this menu you can also tap “Try a demo’ to see how this mode works.
Shortcuts
The following finger gestures can be used when TalkBack is enabled on your Android device.
- Unlock device: Two finger swipe up.
- Identify items: Move finger around the screen or tap and hold on an area.
- Select item: Tap on item. When paused, the last item heard is the selected.
- Open item: Double tap.
- Navigate to next item: Swipe left to right.
- Navigate to previous item: Swipe right to left.
- Scroll: Use two fingers swiping up or down.
- Pause/Resume: Tap with 2 fingers. Can also pause by covering screen.
- Read all from current item: Triple tap with 2 fingers.
Additional Resources
For additional information on the accessibility features offered by Android, visit their website using the following link: https://www.android.com/intl/en_au/accessibility/