How to find and use the accessibility features on Mac OS
Accessibility Settings
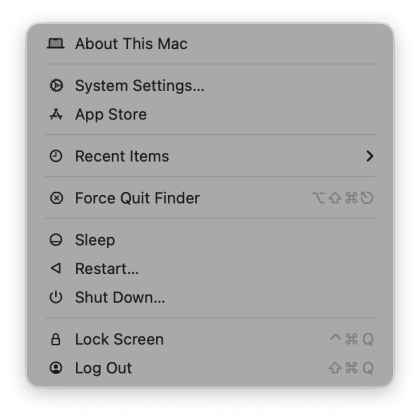
1. Opening System Preferences
On MacOS, “Settings” is called “System Settings”.
- To open System Settings, click the Apple menu in the macOS menu bar, which is on the top left side of the screen, and is depicted as the Apple logo.
- Select ‘System Settings…’ from the drop-down menu
Please note that this guide is based on the settings found in macOS 26 Tahoe, earlier versions may differ in appearance and features. If possible, update your device to the latest version of macOS to ensure you have the most up-to-date accessibility features and settings.
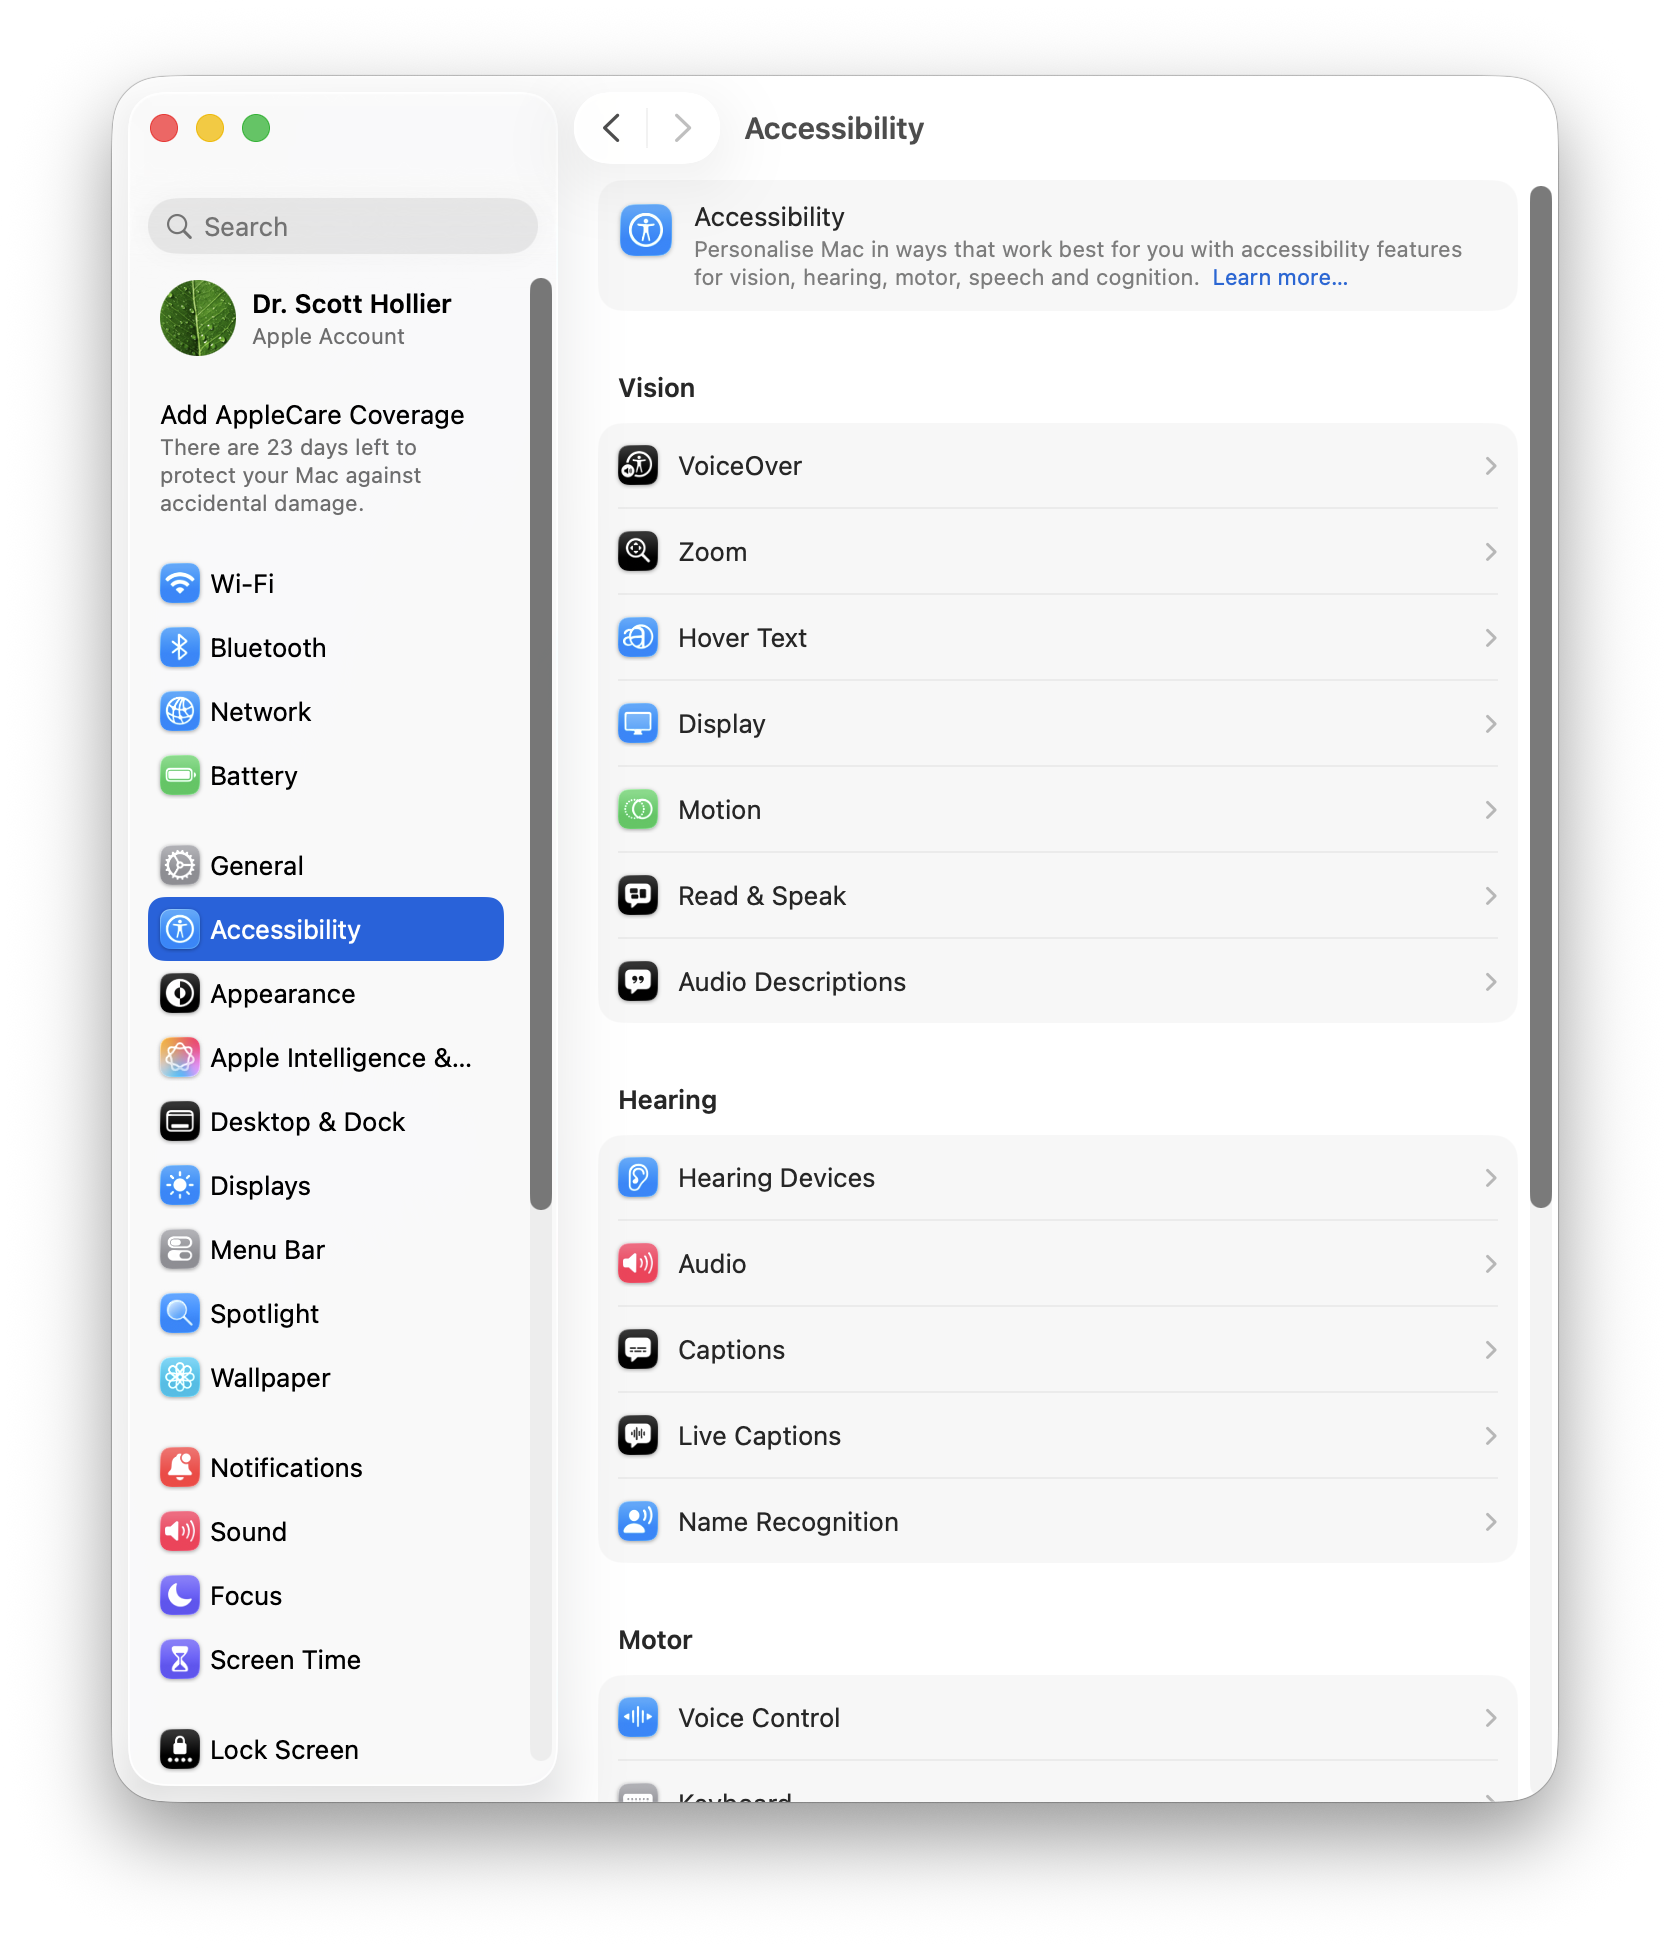
2. Finding Accessibility
Once System Settings is open, it is easy to find Accessibility. Accessibility houses the assistive features offered on MacOS. Select the ‘Accessibility’ item in the left sidebar to access the menu.
Vision-Related
1. VoiceOver
VoiceOver is a built-in screen reader that provides an audible description of what is happening on screen. This is beneficial for users with visual impairments.
Use the following methods to switch on VoiceOver:
- Open System Settings and select Accessibility.
- Find VoiceOver on the right-hand panel.
- Turn on the VoiceOver switch.
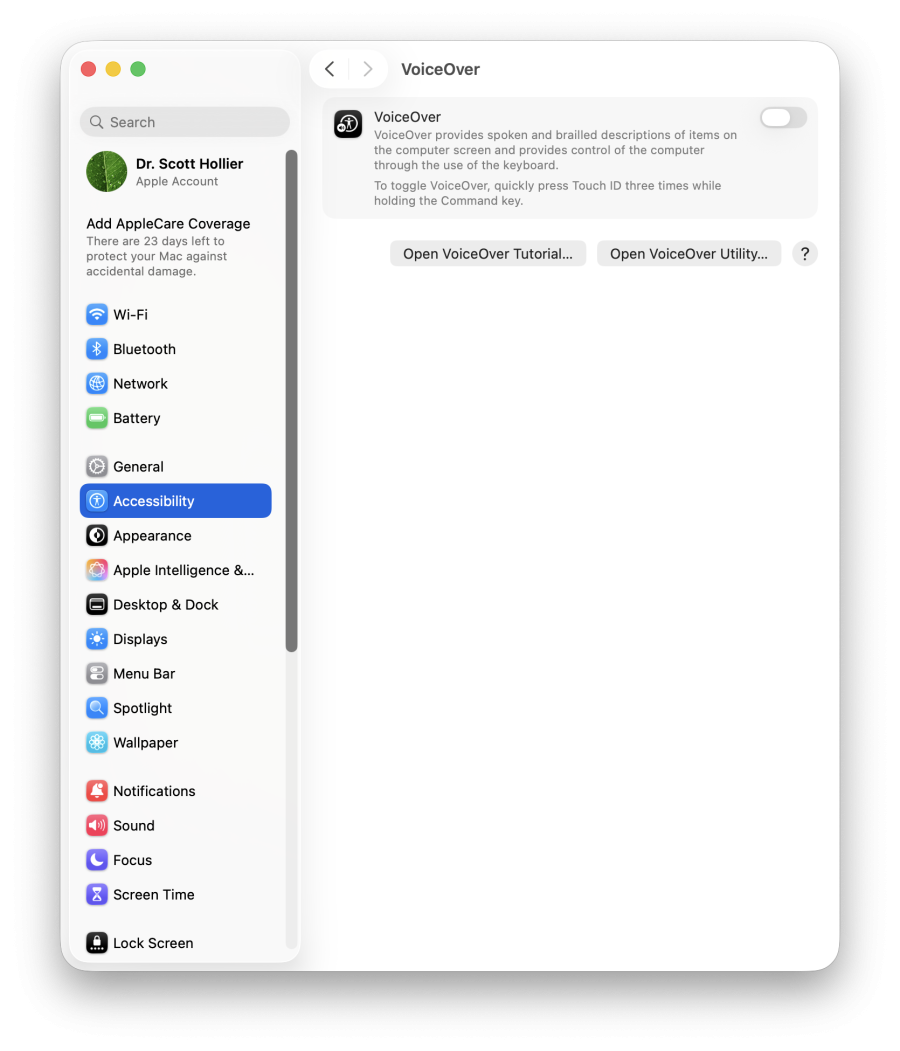
- When the pop-up prompt appears, select “Use VoiceOver” to enable the feature.
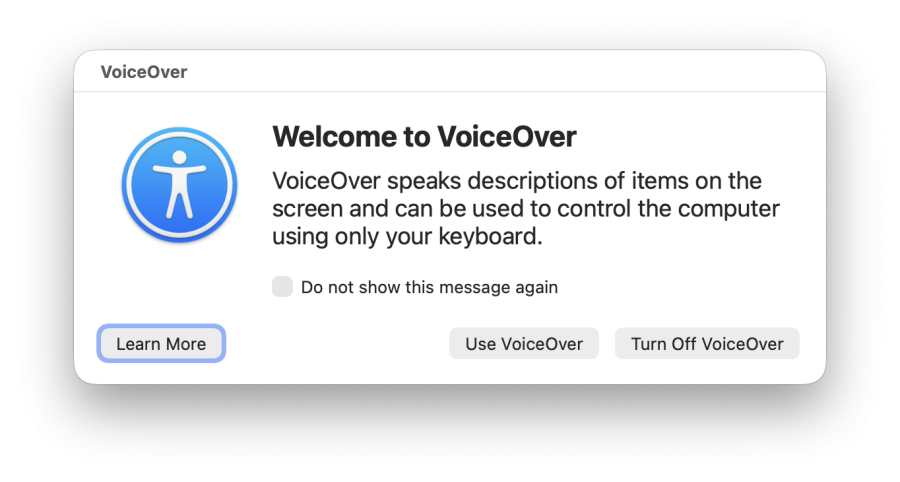
- Alternatively, users can use the keyboard shortcut Command–F5 to enable VoiceOver.
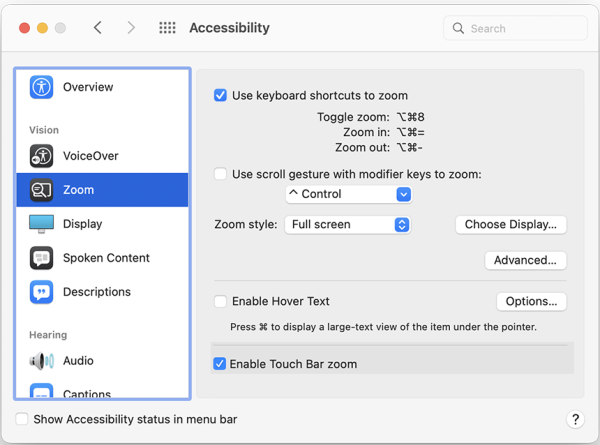
2. Zoom
Zoom allows users to magnify certain areas of their screen to view content more clearly.
2.1. Use keyboard shortcuts to zoom
- Open System Settings and select Accessibility.
- Find Zoom on the right-hand panel.
- Turn on the “Use keyboard shortcuts to zoom” switch.

- Use keyboard shortcuts to zoom in. such as:
- Zoom in: Option–Command–Equals sign (=)
- Zoom out: Option–Command–Minus sign (-)
- Toggle zoom: Option–Command–8
- Exit toggle zoom mode: Option–Command–8 again
2.2. Use scroll gesture with modifier keys to zoom
- Enter the Zoom section in Accessibility.
- Turn on the ‘Use trackpad gesture to zoom’ switch.
- The default key is ^Control at the left bottom of the keyboard.
- You can now zoom in or out by pressing the ^Control while using two fingers to slide up or down.
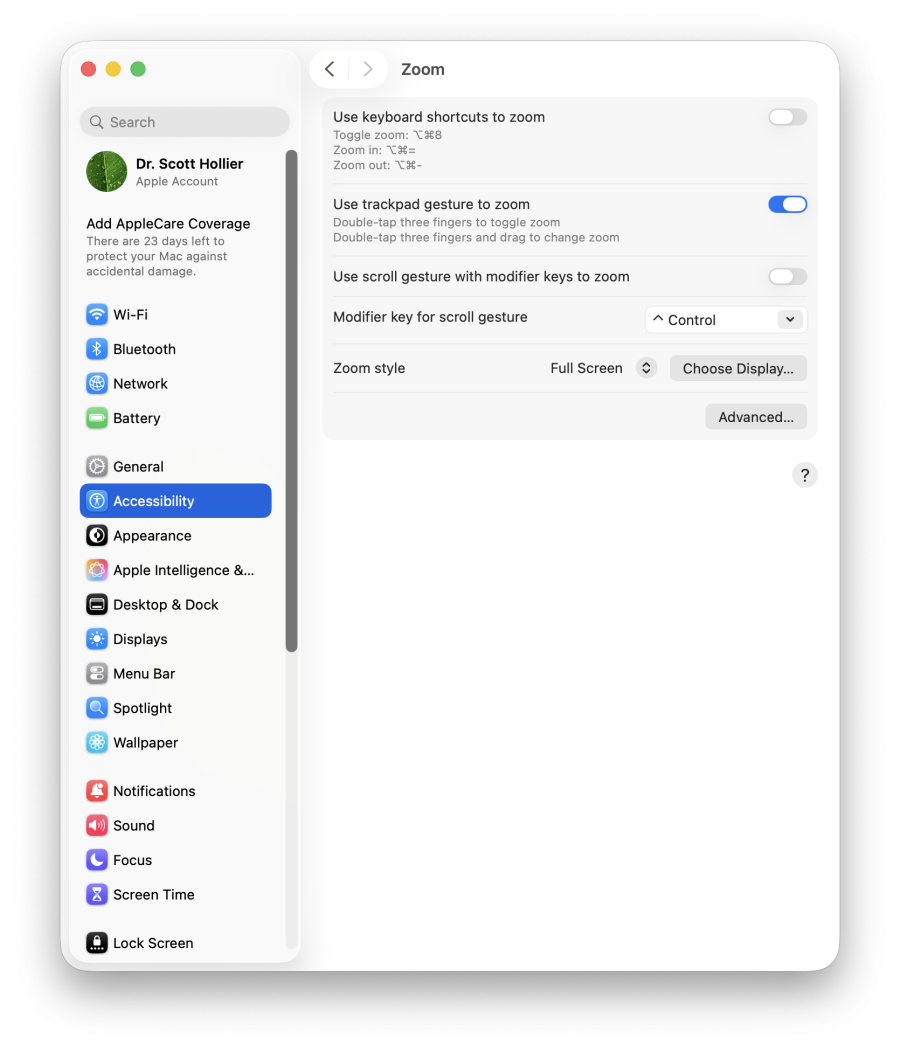
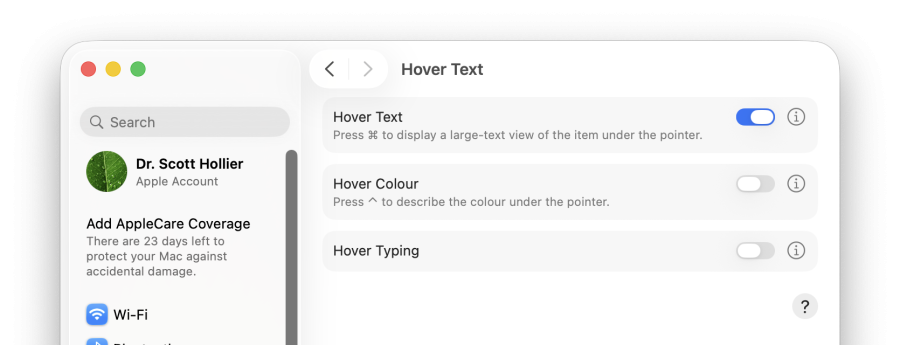
2.3. Enabling hover text:
Hover Text displays an enlarged view of whatever is under the mouse pointer when the command button is pressed. To enable this feature:
- Enter the ‘Hover Text’ menu in the Accessibility Settings
- Turn on the ‘Hover Text’ switch.
- Now you can zoom in by holding the Command key and placing the pointer on the item you want to zoom in on.
2.4. Enable touch bar zoom
Enable Touch Bar zoom is an advanced function for MacBook Pro with a touch bar, which will zoom in the touch bar content once people place and hold their finger on the touch bar. Note that Apple no longer manufacture MacBook devices with a Touch Bar, this will only apply to older models that have this feature.
- Tick Enable Touch Bar Zoom
- Now the information on the touch bar will zoom in and display on the screen once the user places their finger on it.
3. Display Settings
3.1. Accessing Display Settings
- Click the Apple menu.
- Open System Settings and select Accessibility.
- Find Display on the right-hand panel.
- You can now adjust various display settings.
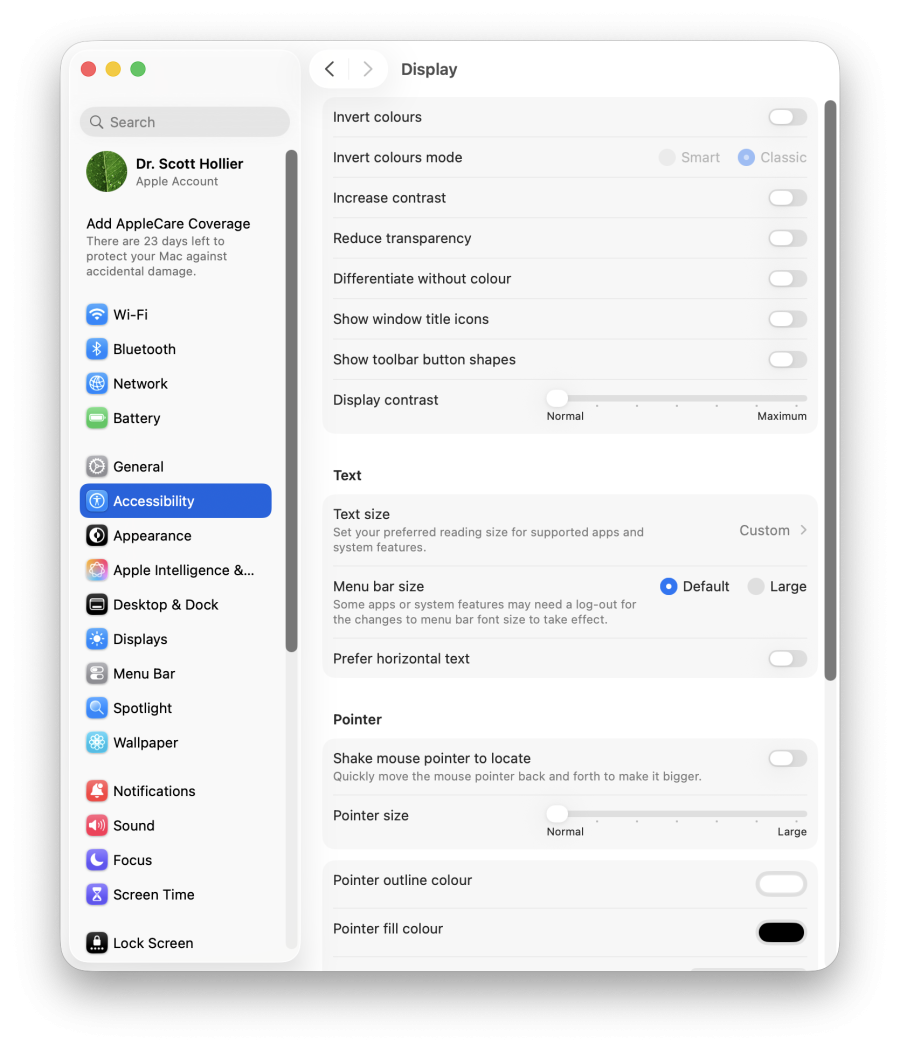
3.2. Display
In the display settings, there are multiple features to change to the user’s preference:
- Invert colours: Invert the colours on the display, and select between smart and classic inversion modes.
- Increase contrast: Increase the contrast of items on screen without changing the contrast of the screen. This improves readability on-screen.
- Reduce transparency: Replace the transparent effect on some backgrounds with a darker background.
- Differentiate without colour: Use shapes, not colour, to convey information or status.
- Show window title icons: Adds an icon next to the title of the current folder you are viewing in Finder to assist in identifying the current folder you’re in.
- Show toolbar button shapes: Increases the visibility of toolbar buttons in applications by adding a visible shape around them.
- Display contrast: A slider to adjust the contrast of the display to your preferences.
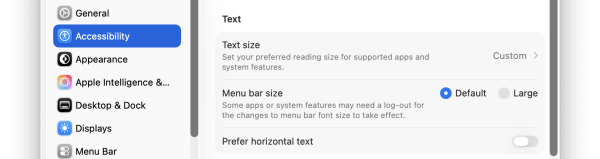
3.3. Text
In the display settings, under the ‘Text’ section, there are multiple features to change to the user’s preference:
- Text size: Adjust the text size larger or smaller to your preferences.
- Menu bar size: Change the size of the menu bar text between default and a larger size.
- Prefer horizontal text: When using languages that may use vertical text, this setting will prioritise using horizontal text.
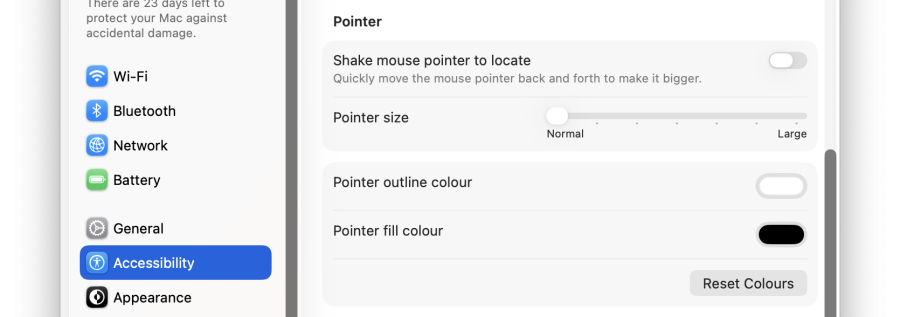
3.4. Pointer
In the display settings, under the ‘Pointer’ section, there are four options to change mouse preferences:
- Shake mouse pointer to locate: Quickly move the mouse pointer back and forth to make it bigger
- Pointer Size: To change the pointer size, move the dot along with the slider.
- Pointer outline colour: To change the point outline colour click on the colour field and choose the Palette.
- Pointer fills colour: To change the point fill colour click on the colour field and choose the Palette.
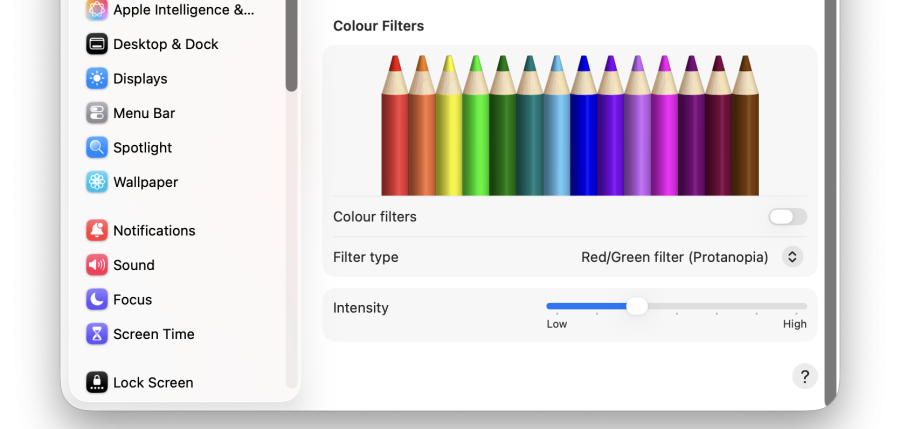
3.5. Colour Filters
Under the Colour Filters tab, users can enable colour filters and change the filter type:
- Enabling colour filters: To enable colour filters, turn on the “Colour filters” switch.
- Changing the filter type: To change the filter type, click on the drop-down menu to select a filter.
- Intensity: Change the intensity of the filter to your preference.
Note: The selection of particular filters will produce additional preference options. For example, certain colour blindness filters give users the option to change the intensity.
4. Dark Mode
MacOS allow users to change the appearance of their system. There are three modes: Light, Dark and Auto (Auto changes from Light mode to Dark mode depending on the time of day).
Enabling Dark Mode
- Click the Apple menu.
- Open System Settings and select Appearance in the left-hand sidebar.
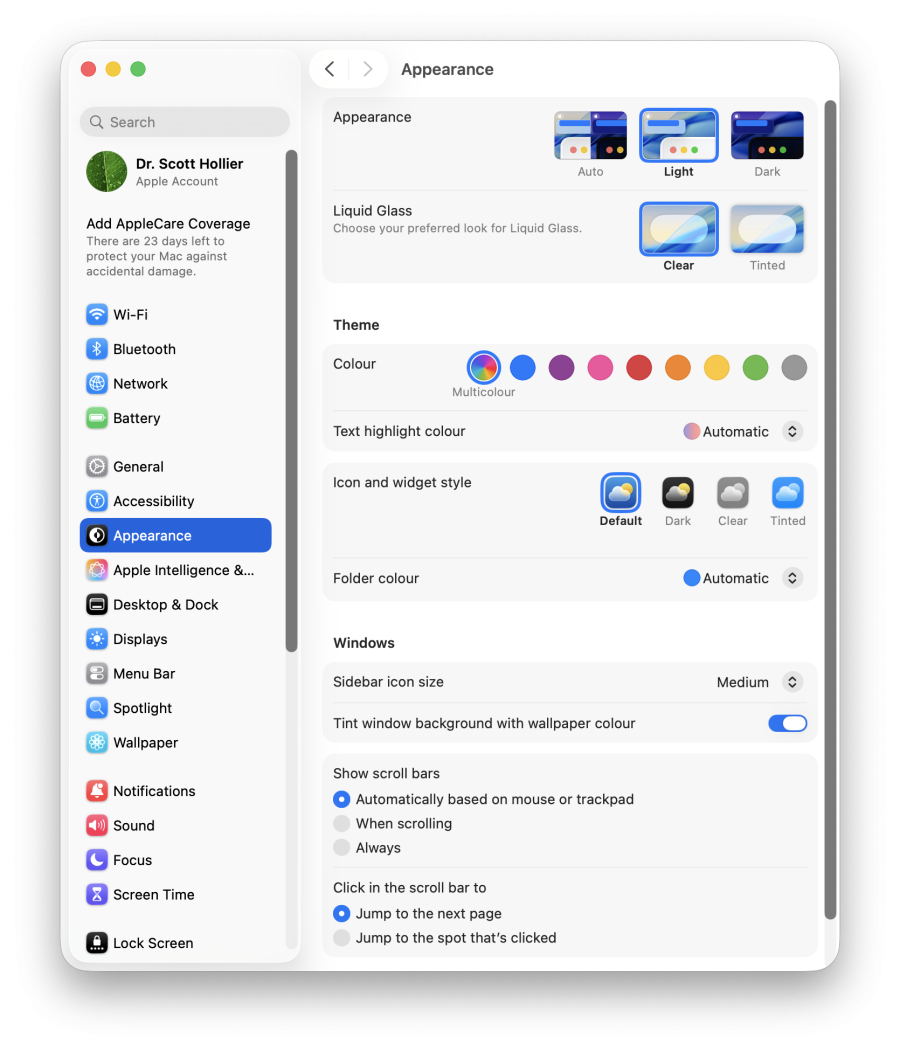
- At the top of the “Appearance” options, select ‘Dark’.
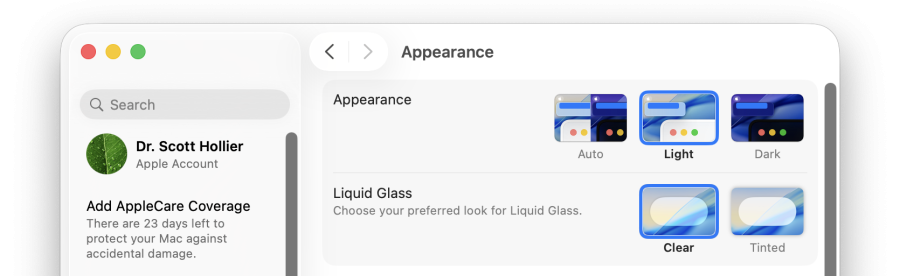
- The Dark Mode theme should now be applied.
5. Spoken Content
MacOS gives users the option to change the voice they hear when the system reads content on the page.
- Click the Apple menu.
- Open System Settings and select Accessibility.
- Find Read & Speak on the right-hand panel.
- From the Read & Speak menu, you can change the following settings:
- Accessibility Reader: Reads out text when using the Accessibility Reader function of macOS.
- Speak selection: Allows the option to read any selected text out loud when prompted by the user.
- Speak item under the pointer: This will read out any words that are currently under the cursor.
- Speak announcements: Any alerts that macOS generates will be read out loud when they appear.
- Speak typing feedback: Typed characters will be spoken out loud.
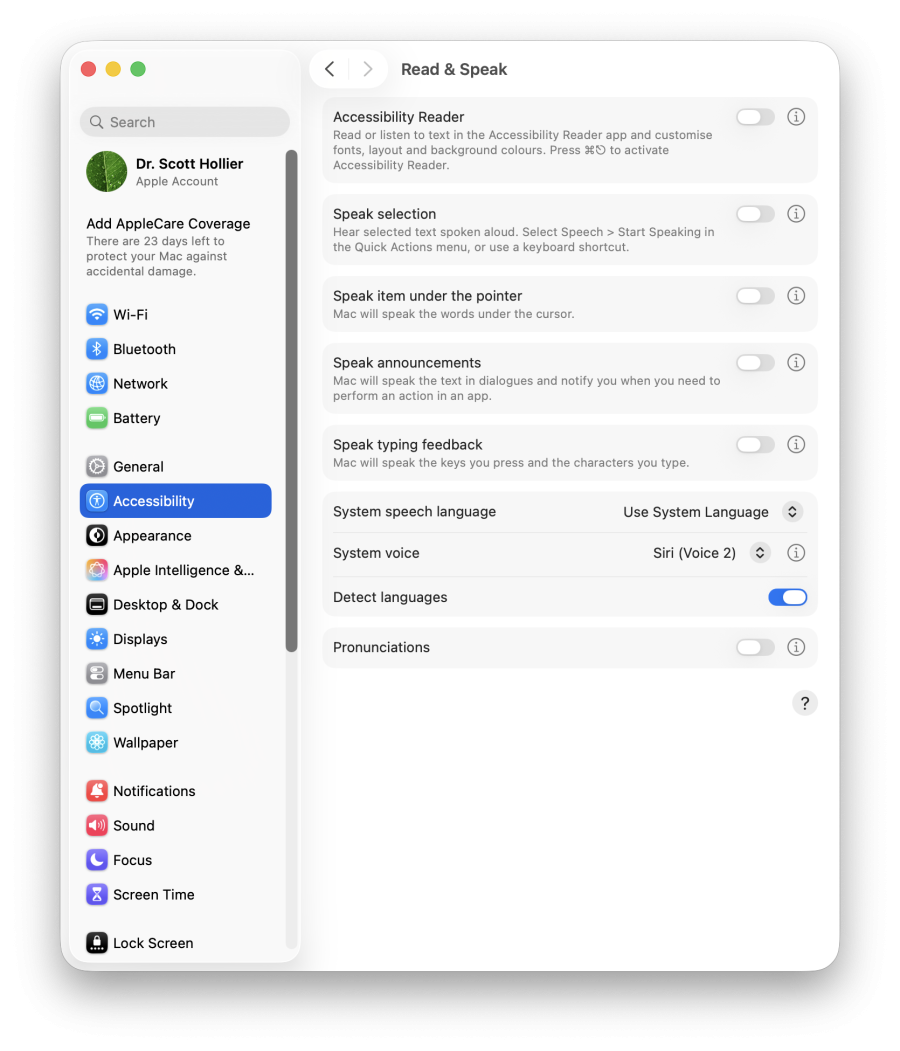
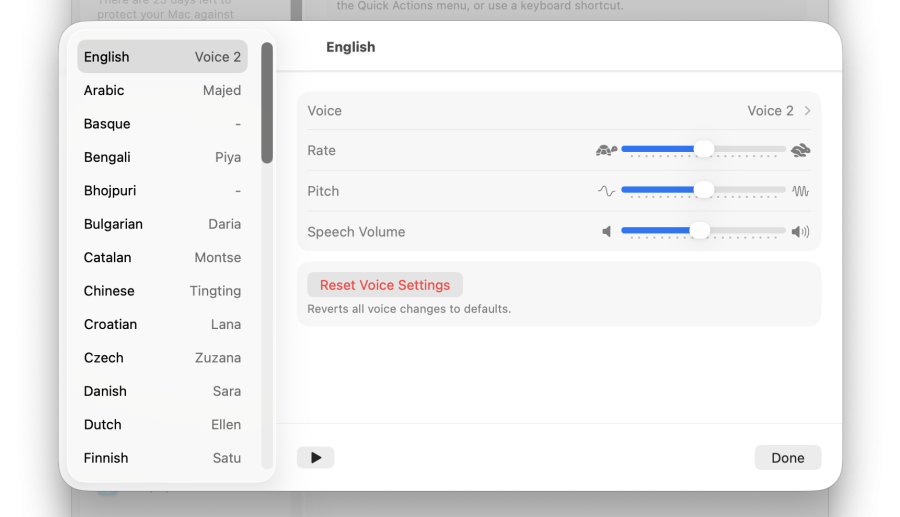
Additionally, there are options for setting the language and voice of macOS’s text-to-speech engine, and clicking on the ‘i’ button next to ‘System voice’ will allow you to set the rate, pitch, and volume of the speech to your preferences.
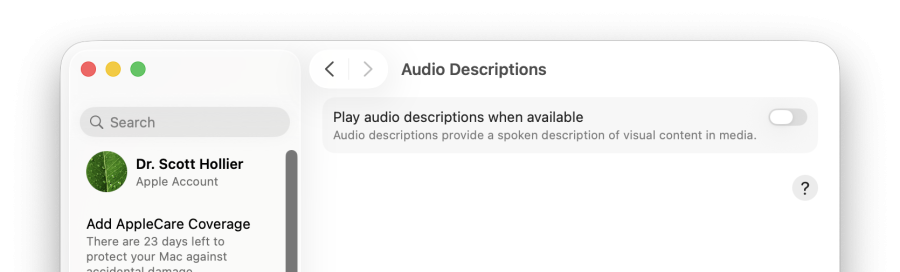
6. Audio Descriptions
Audio Descriptions provide spoke descriptions of visual content in media. If audio descriptions are available, they will play if the feature is enabled.
Enabling Audio Descriptions
- Click the Apple menu.
- Open System Settings and select Accessibility.
- Find Audio Descriptions on the right-hand panel.
- Turn on the switch that says, “Play audio descriptions when available”.
Hearing-Related
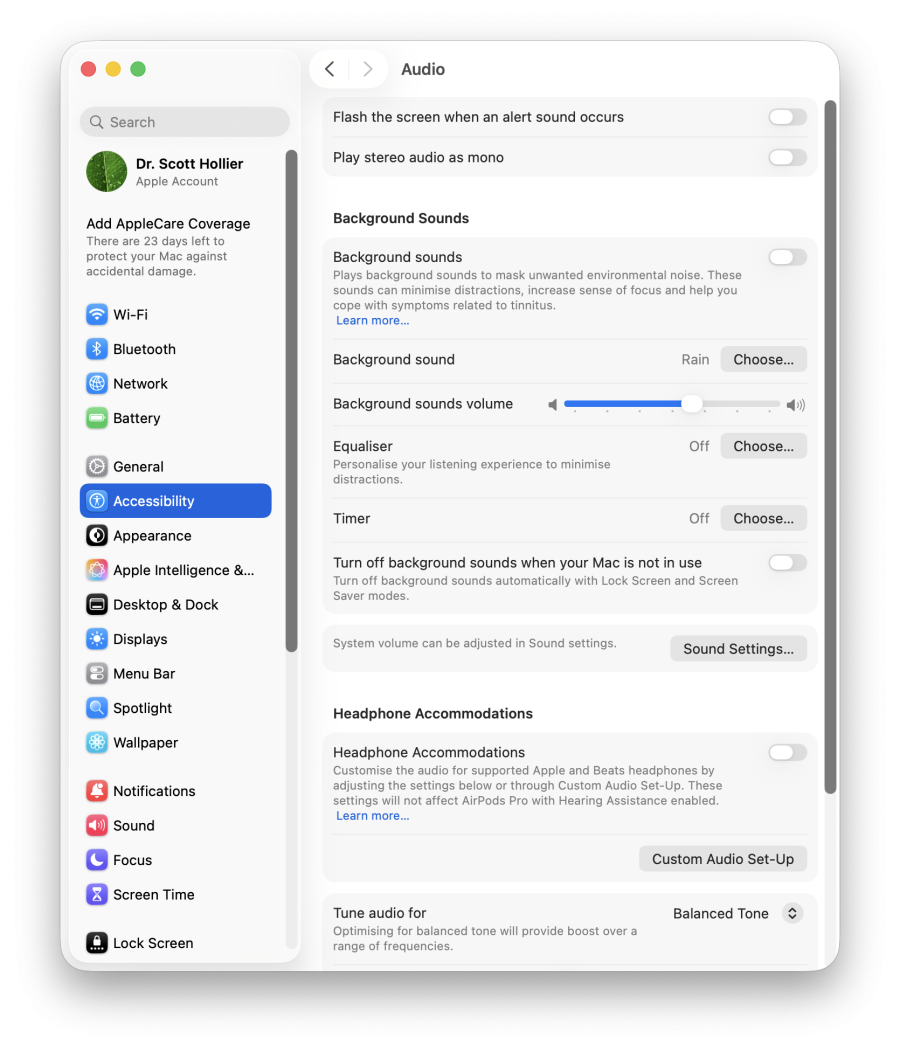
1. Audio
Accessing Audio
- Click the Apple menu.
- Open System Settings and select Accessibility.
- Find Audio on the right-hand panel.
- From the Audio panel, you can change the following settings:
- Flash screen when an alert sounds: Makes your screen flash when you receive an alert.
- Play stereo audio as mono: Make your Mac play stereo audio tracks as mono audio in the left and right speakers or headphones.
There are also settings for turning on Background sounds, a variety of sounds to help you relax and settings to customise those sounds to your preferences. Also, if you own Apple or Beats brand headphones or earbuds, they can also be customised to your tastes from this menu.
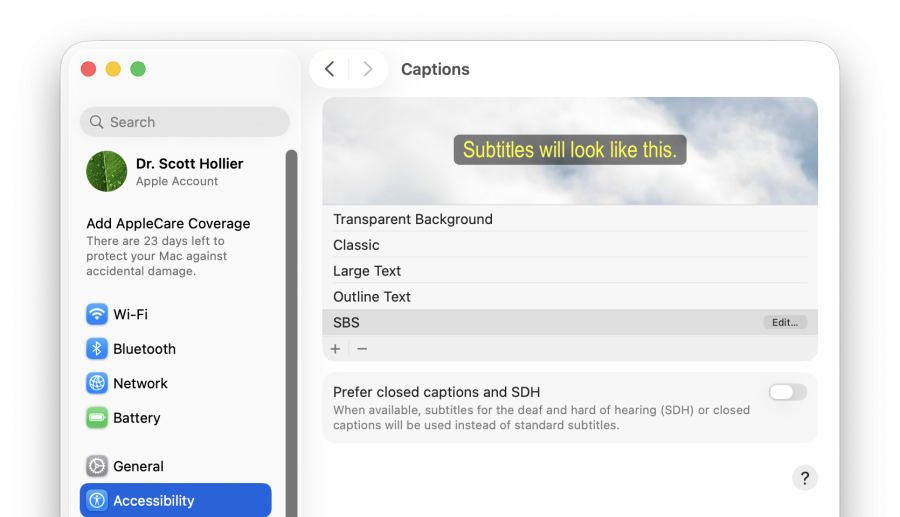
2. Audio Captions
Audio captions include captions and subtitles. Captions are the text version of the audio media being viewed and provide additional information such as descriptions of background noise and other audio cues (for example, a phone ringing). Subtitles are a text alternative for spoken dialogue (for example, translations for people who do not speak the language of the dialogue in a film, TV series or video.)
To find Captions:
- Click the Apple menu.
- Open System Settings and select Accessibility.
- Find Captions on the right-hand panel.
- From the Captions menu, you can change the following settings:
- Styles list: Choose from available built-in caption style including transparent background, classic, large text and outline text.
- Prefer closed captions and SDH: If they’re available, use closed captions or SDH instead of standard subtitles for content played on your Mac.
General and Mobility-Related
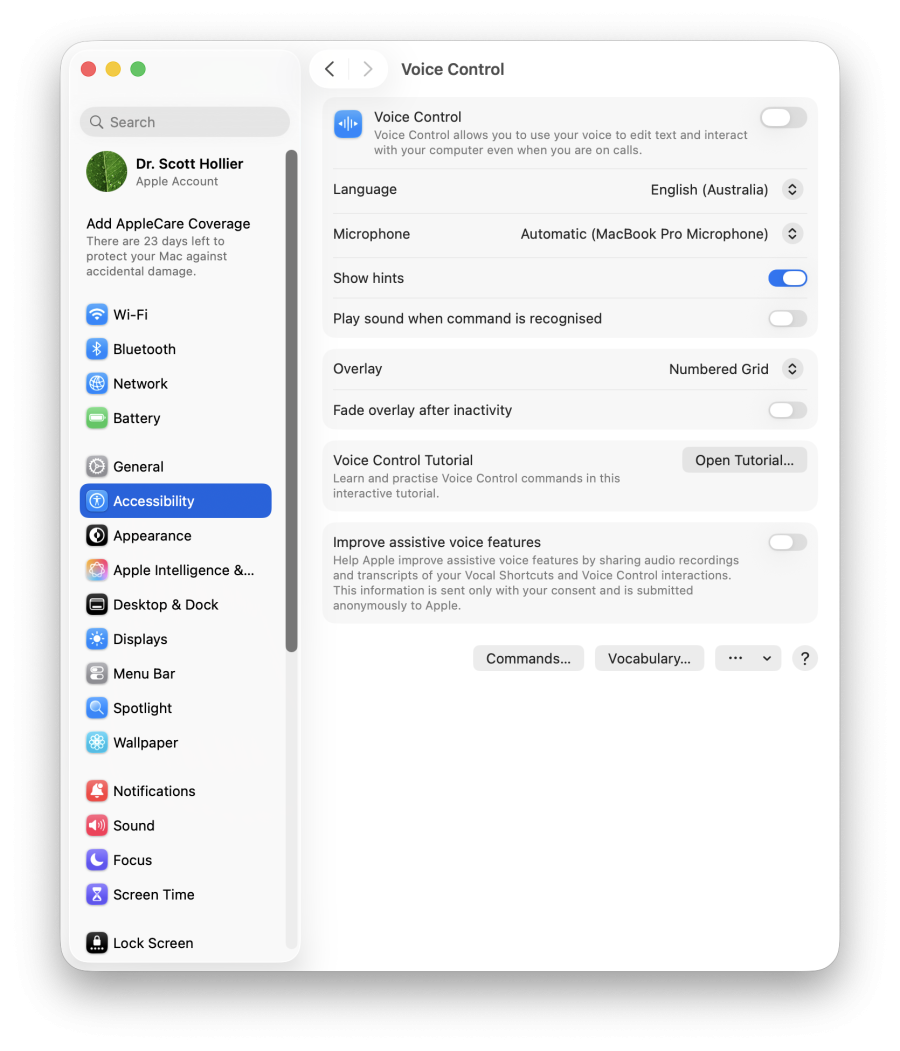
1. Voice Control
With Voice Control in macOS, users can use speech commands to control their devices. The feature has been designed for those folks with limited dexterity, mobility, and other conditions available on iPhone, iPad, and Mac. It also serves as a great new way to interact with your devices.
Enable Voice Control
- Click the Apple menu.
- Open System Settings and select Accessibility.
- Find Voice Control on the right-hand panel.
- Turn on the “ Voice Control” switch.
Note: it might take new users some time to download. - Furthermore, you can also change languages or microphone output.
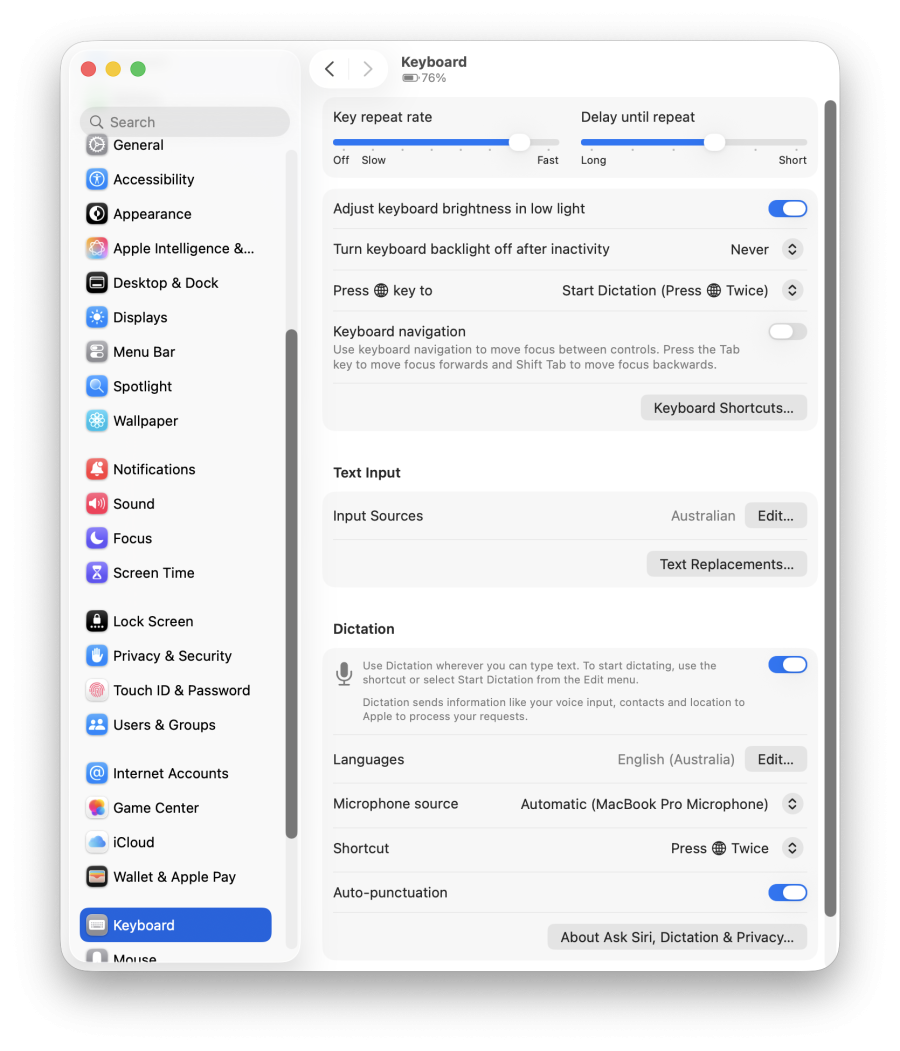
2. Keyboard
2.1. Accessing Keyboard
- Click the Apple menu.
- Open System Settings and select Accessibility.
- Find Keyboard on the right-hand panel.
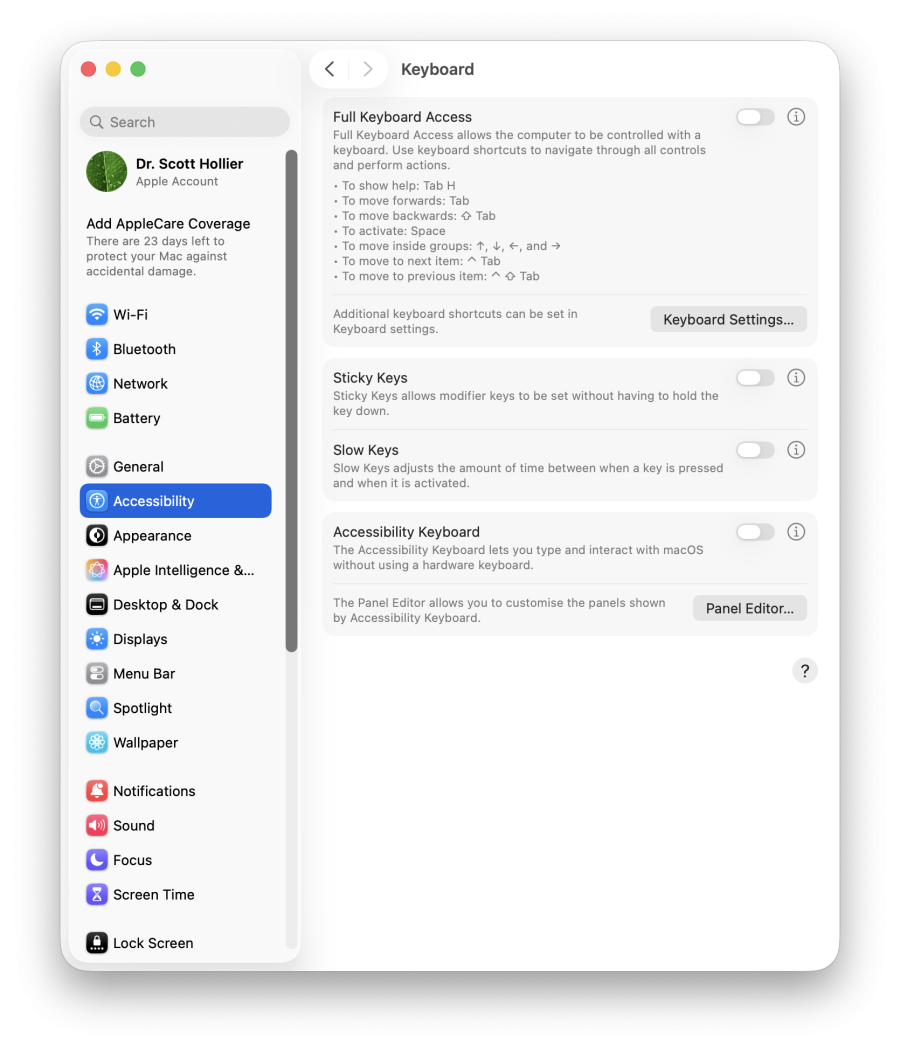
2.2. Full Keyboard Access
Full Keyboard Access is a function that allows you to control your computer and perform various actions by using keyboard shortcuts. To allow this function:
- Turn on the Enable Full Keyboard Access switch.
- This will unlock full keyboard shortcuts such as:
- To show help: Tab H
- To move forwards: Tab
- To move backwards: ↑Tab
- To activate: Space
- To move inside groups: ↑,↓,← and →
- To move to the next item: ^Tab
- To move to the previous item: ^↑Tab
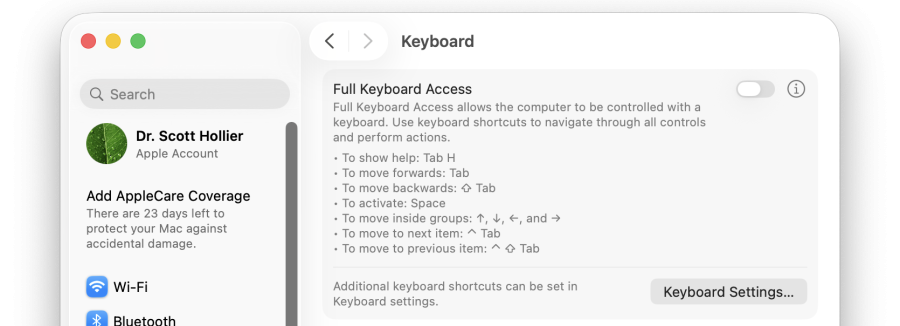
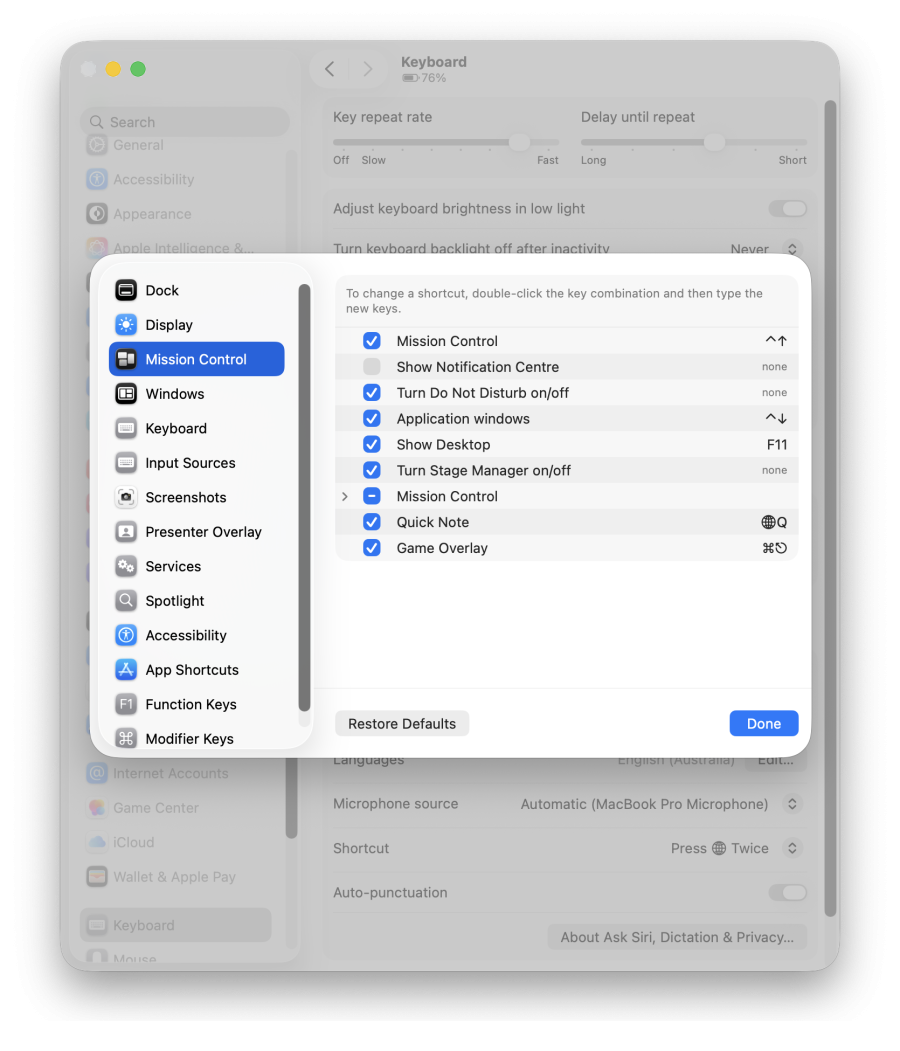
Furthermore, you can click on the Keyboard Settings to access more settings, and the ‘Keyboard Shortcuts…’ button allows you to customise the shortcuts to your preferences.
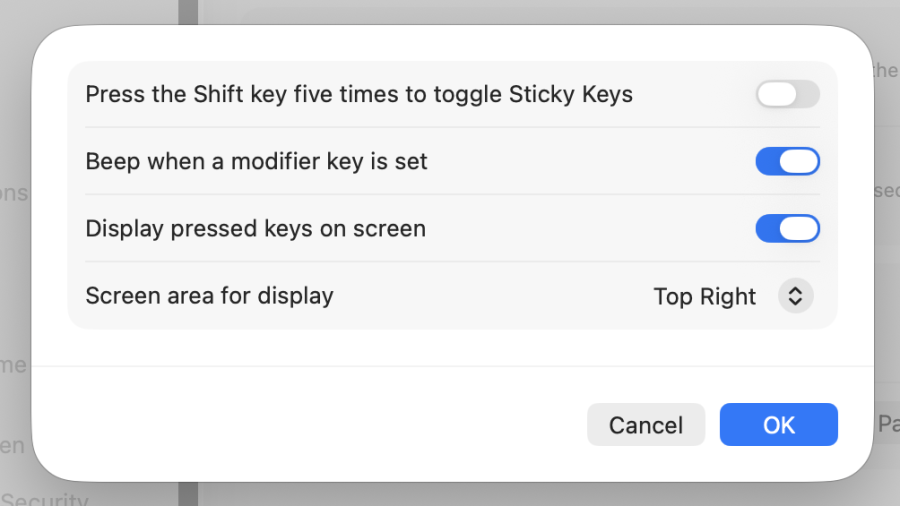
2.3. Sticky Keys & Slow Keys
From the Hardware tab, you can change settings for Sticky keys and Slow keys.
Sticky Keys allows modifier keys to be set without having to hold the key down. To enable:
- In the Keyboard settings, turn on the Sticky Keys switch.

- You can change Sticky Keys options by clicking the ‘i’ button next to the Sticky Keys option and change the following settings:
- Press the Shift key five times to toggle Sticky Keys: Use your keyboard to turn Sticky Keys on or off.
- Beep when the modifier key is set: Have your Mac make a sound when you press a modifier key.
- Display pressed keys on screen: Choose the area of the screen where you want to display symbols to indicate which modifier keys you press.
- Screen area for display: You can select where an on-screen indicator will be shown to tell you when the shift key is being pressed.
Slow Keys adjusts the amount of time that passes between when a key is pressed and when it activates. To enable:
- Turn on the “Slow Keys” switch.

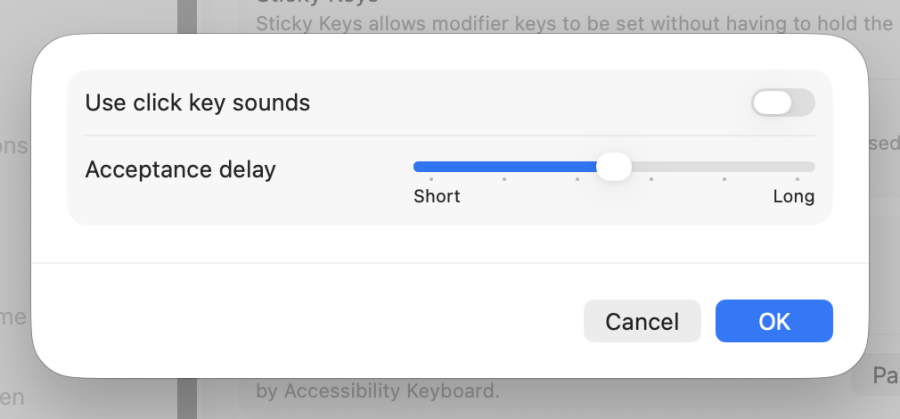
- You can change Slow Keys options by clicking the Options button next to the Sticky Keys option and change the following settings:
- Use click key sounds: Have keys make a sound when pressed. One sound plays when you press a key and a different sound plays when the key press is accepted.
- Acceptance Delay: Set the delay between when you press a key and when it’s accepted.
2.4. Accessibility Keyboard
In the Keyboard settings, you can change settings for the Accessibility Keyboard
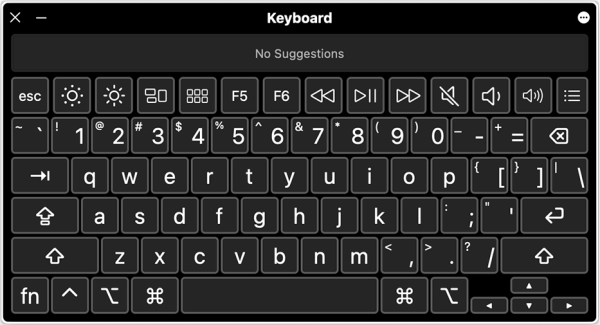
The Accessibility Keyboard lets users interact with the system without using a physical/hardware keyboard.
Enabling Accessibility Keyboard:
- Turn on the Accessibility Keyboard switch.

- Use the mouse pointer to click the keyboard to use.
3. Pointer Control
Users can change the method in which they move the mouse pointer or pointer, which is especially helpful if they cannot use a mouse or touchpad.
3.1. Accessing Pointer Control
- Click the Apple menu.
- Open System Settings and select Accessibility.
- Find Pointer Control on the right-hand panel.

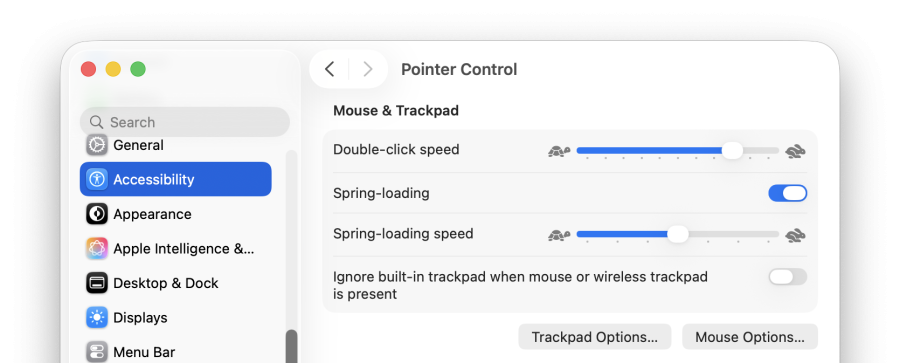
3.2. Mouse & Trackpad
In the Mouse & Trackpad section, you can change the following settings:
- Double-click speed: Adjust the mouse or trackpad’s reaction time when you double-click an item.
- Spring-loading: When this switch is on, holding your cursor over a folder while dragging a file will ‘spring’ open the folder for you.
- Spring-loading speed: Control the timing when you drop items into folders and set how long an item has to be over a folder before the folder opens.
- Ignore built-in trackpad when mouse or wireless trackpad is present: Disable the built-in trackpad on your Mac when you use a mouse or wireless trackpad.
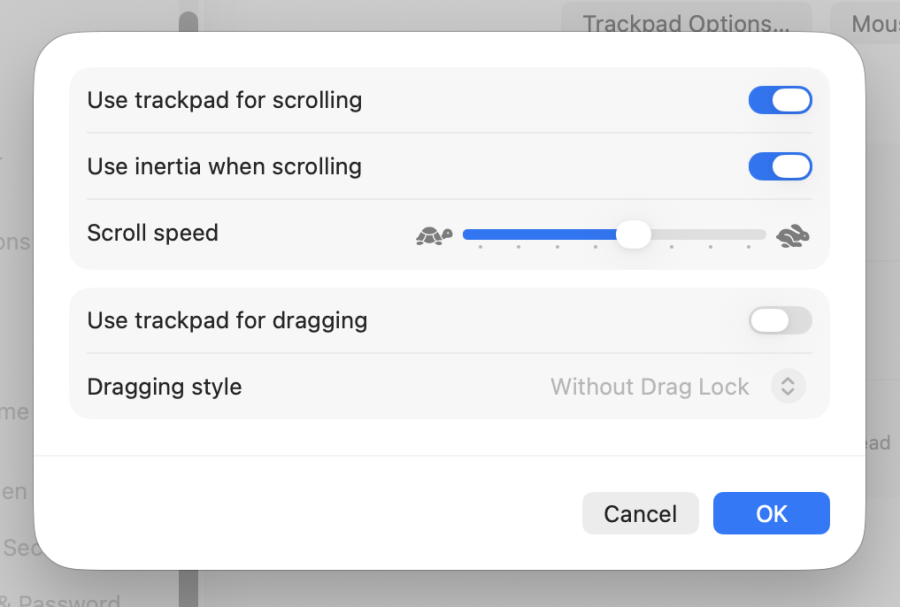
You can click on the Trackpad options where you can change the following settings for the Trackpad:
- Use trackpad for scrolling: This switch turns on or off the ability to scroll with the trackpad.
- Use inertia when scrolling: You can turn on and off whether the trackpad scroll gesture continues to scroll when you lift your fingers from the trackpad.
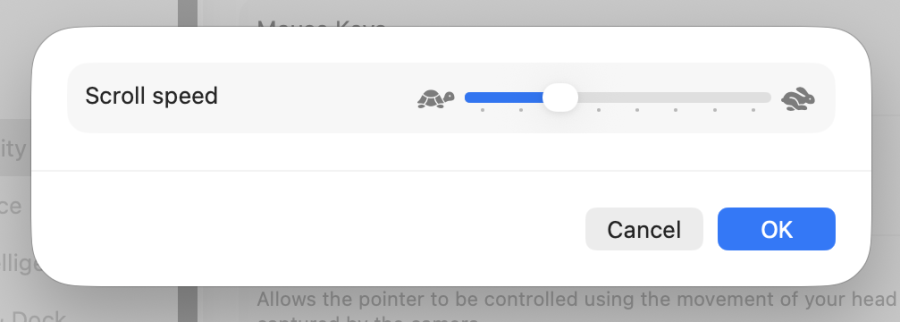
- Scroll speed: This slider adjusts the scrolling speed when using the trackpad gesture to scroll.
- Use trackpad for dragging: Turn this switch on to allow you to drag using the trackpad, and use the drop down menu beneath it to adjust how the trackpad will drag items.
You can click on the Mouse options where you can change the following settings for the Mouse:
- Scroll speed: The speed at which you scroll through documents and windows using the mouse.
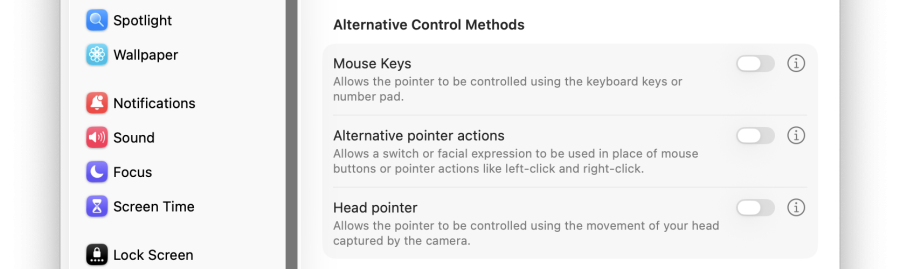
3.3. Alternative Control Methods
From the Alternative Control Methods tab, you can change the following settings:
- Mouse Keys: Allows the pointer to be controlled using the keyboard keys or number pad.
- Alternative Pointer Options: Allows a switch or facial expression to be used in pace of mouse buttons or pointer actions like left-click and right-click.
- Head Pointer: Allows the pointer to be controlled using the movement of your head captured by the camera built into your Mac or another camera connected to your Mac.
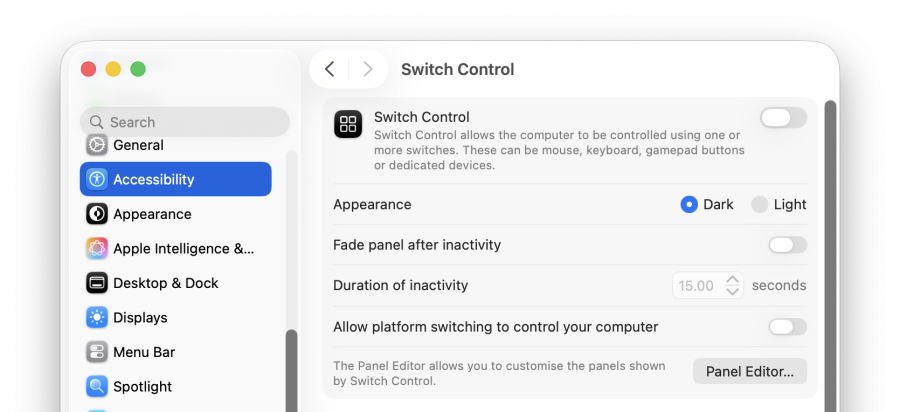
4. Switch Control
Switch Control allows the user’s Mac to be controlled using multiple switches, such as a mouse, keyboard, gamepad devices and other adaptive devices.
4.1. Accessing Switch Control
- Click the Apple menu.
- Open System Settings and select Accessibility.
- Find Switch Control on the right-hand panel.
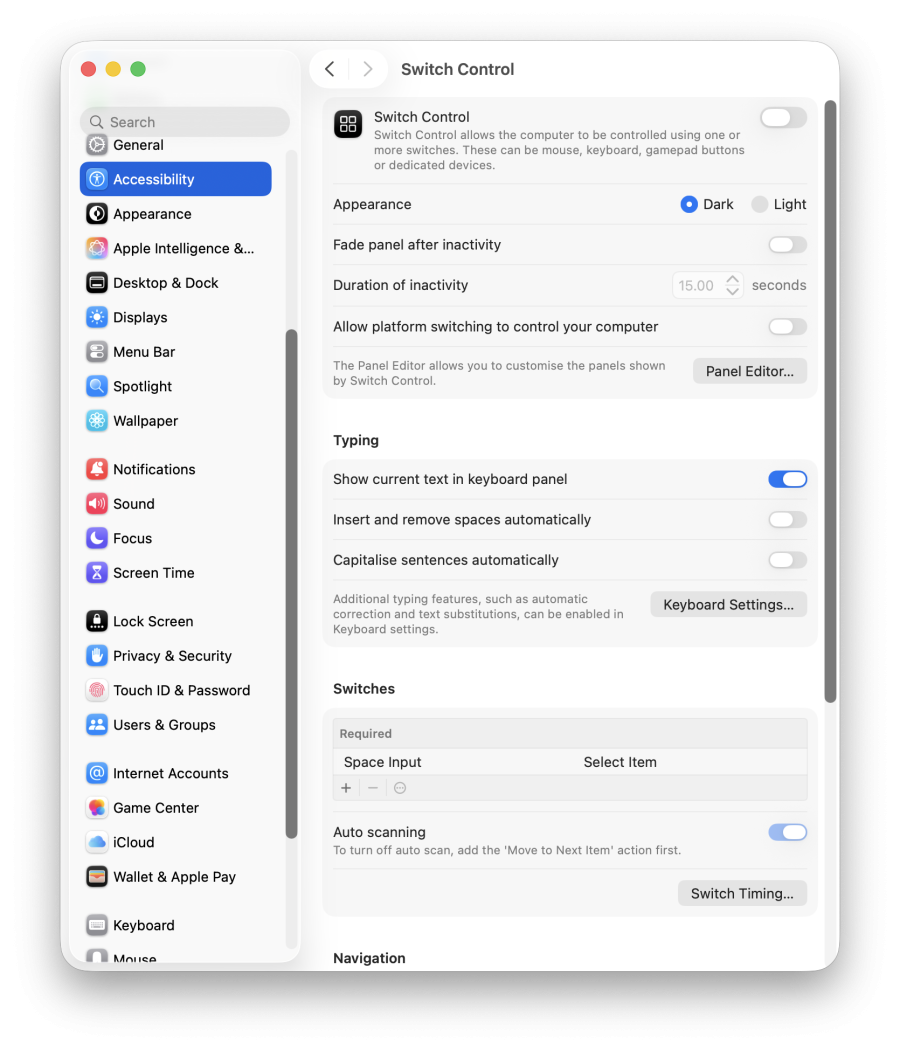
4.2. Enable Switch Control
- Click the Apple menu.
- Open System Settings and select Accessibility.
- Find Switch Control on the right-hand panel.
- Turn on the “Switch Control” switch.
- The flowing Switch Control screen will appear

- Now you can choose to use what switches to control your MacBook according to your preferences.
- Furthermore, you can also change the appearance between Dark or Light using the radio buttons in the settings window.
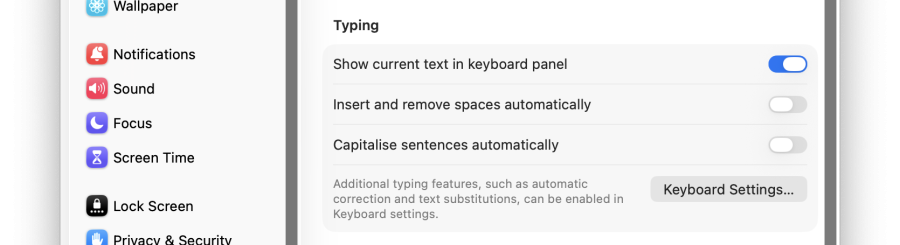
4.3. Typing
In the Typing section, you can change the following settings:
- Show current text in keyboard panel: Display a bar at the top of the keyboard panel to display text as you currently typing.
- Insert and remove spaces automatically: Let Switch Control manage spaces as it automatically corrects spacing after a full stop or between sentences.
- Capitalise sentences automatically: Let Switch Control manage capitalisation as it automatically capitalises letters after a full stop.
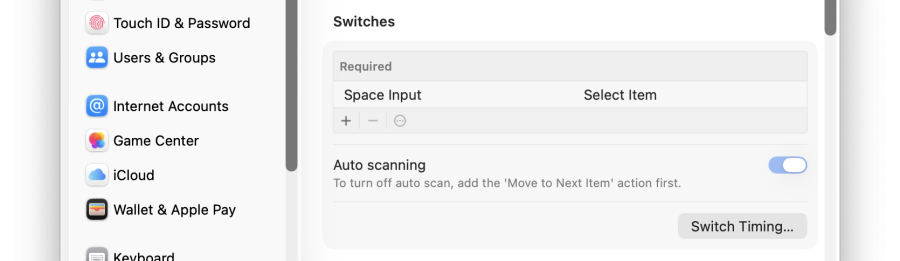
4.4. Switches
On your Mac, use the Switches pane of Switch Control preferences to add and delete switches, assign actions to switches, and set options for auto scanning.
- Required: Switch Control requires the Select Item switch. When auto scanning is on, Switch Control automatically moves to the next item as it steps through a panel, group or the user interface.
- Optional: Optional switches to use, regardless of whether auto scanning is on or off.
- Add +, Remove – : Add or remove an optional switch.
- Auto scanning: You can turn on or off the auto scanning function of Switch Control.
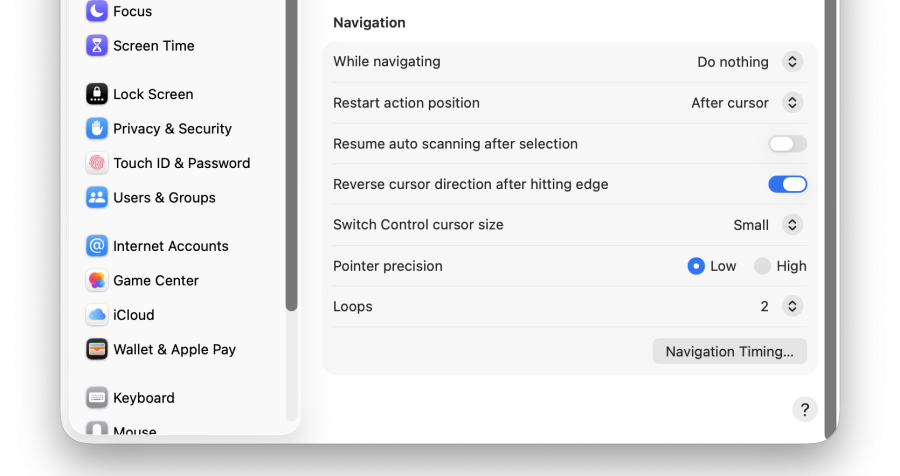
4.5. Navigation
From the Navigation tab, you can change the following settings:
- While navigating: Choose what happens when an item is highlighted during a scan.
- Restart action position: Choose the position from where to start when you rescan an item.
- Resume auto scanning after select: Decide whether it can do auto scanning or not after an item has been selected.
- Reverse cursor direction after hitting edge: Choose whether the cursor reverses when reaching the edge, or if it loop backs to the beginning.
- Switch Control cursor size: Choose the thickness of the border of the Switch Control cursor when scanning the user interface.
- Pointer precision: Choose the precision with which you control the pointer when selecting an item on the screen.
- Loops: The number of times, up to 10, that a panel, group, or window is scanned.
- Navigation Timing: Set timing options for navigation.
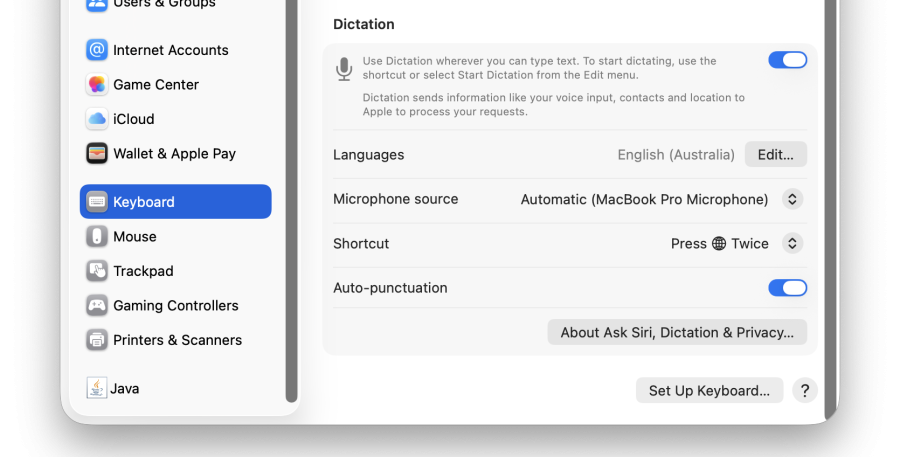
5. Dictation
With keyboard dictation, you can dictate text anywhere you can type it.
- Click the Apple menu.
- Open System Settings and select Keyboard.
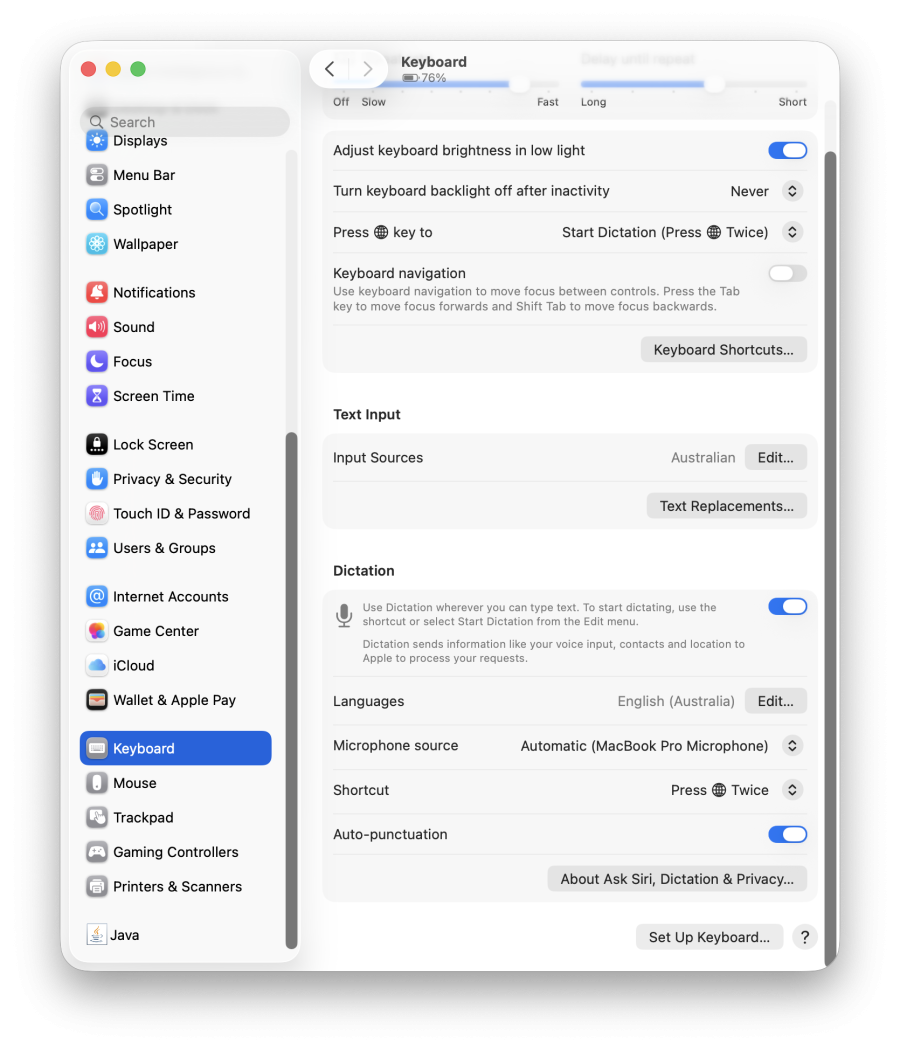
- Turn the switch on to enable Dictation.
- In the Dictation section, you can change the following settings:
- Languages: Select the spoken languages that you want to be recognised.
- Microphone source: Click the pop-up menu below the microphone icon, then choose a microphone. If you choose Automatic, your Mac listens to the device you’re most likely to use for keyboard dictation.
- Shortcut: You can change the keyboard shortcut to turn voice dictation on and off.
- Auto Punctuation: This switch sets whether you want voice dictation to auto punctuate your speech, or whether you want to speak punctuation manually.
- Once you have turned on Dictation or pressed the shortcut to enable Dictation, the following prompt will appear asking if you want to enable dictation. Tap ‘Enable’ to proceed.
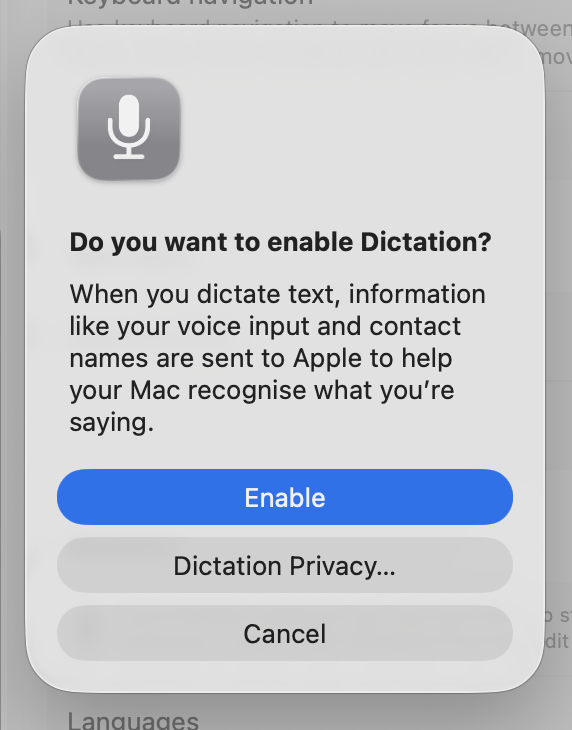
- You can now press the Dictation shortcut that you selected to use Dictation. A microphone icon appears indicating that you can now speak where you would normally enter text.
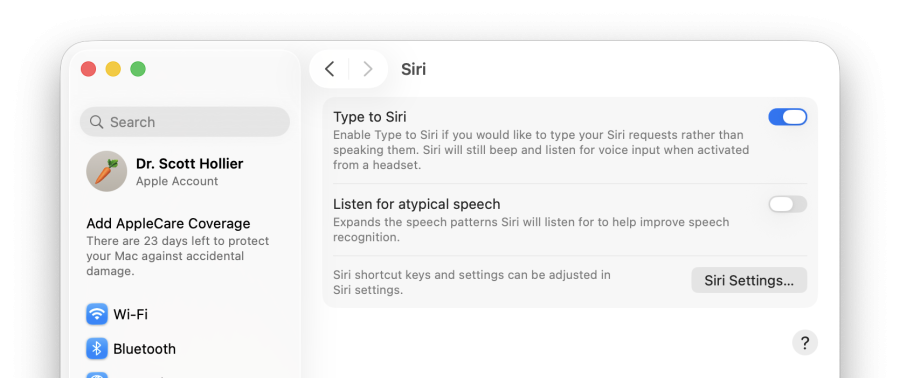
6. Apple Intelligence & Siri
Apple Intelligence (on compatible macOS devices) and Siri allows users to type in their requests instead of speaking to them. Apple Intelligence has this feature by default, for devices not supported by Apple Intelligence, or, if it is turned off, Type to Siri needs to be manually turned on. Siri will still listen for voice input when activated from a headset regardless of this setting.
Enable Type to Siri
- Click the Apple menu.
- Open System Settings and select Accessibility.
- Find Siri on the right-hand panel.
- Turn on the “Type to Siri” switch.
- To use Siri users need to have Siri turned on first, if not turned on users can click on Open Siri Settings down below and turn on the Siri switch.
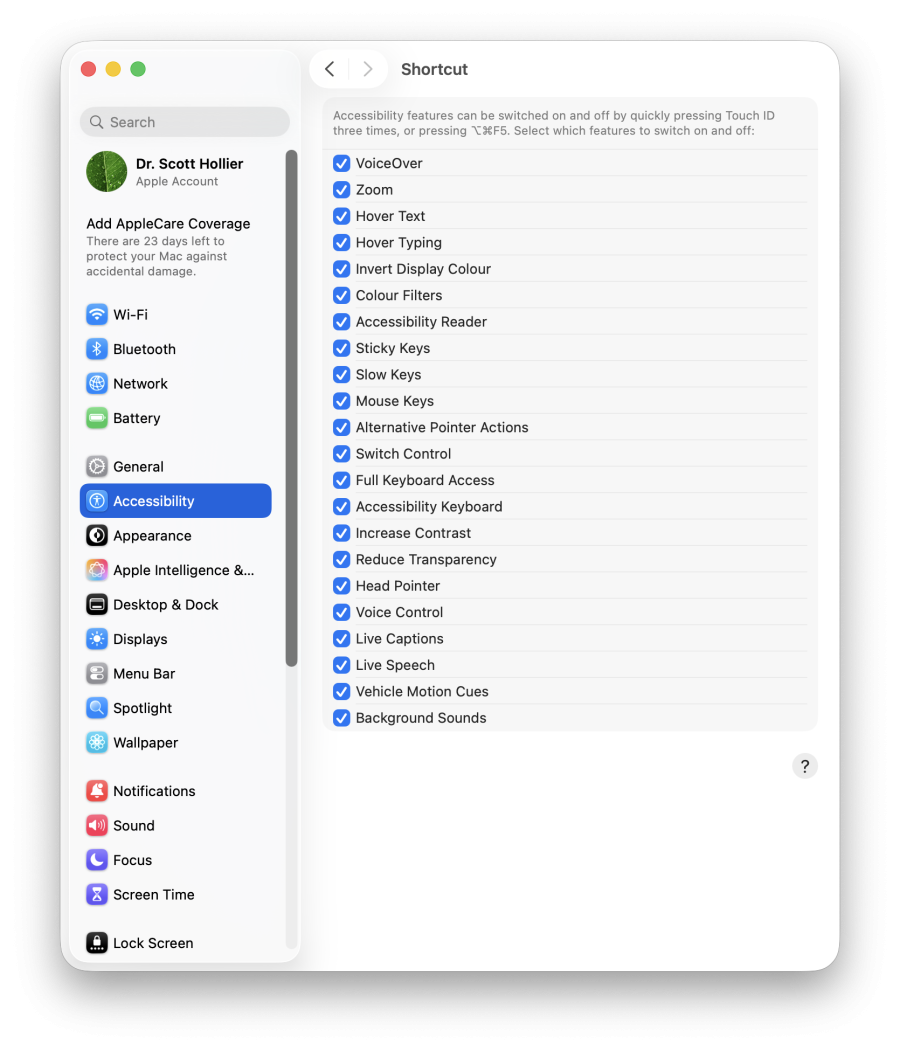
7. Accessibility Shortcuts
Select the shortcuts that appear in the Accessibility Options. Accessibility Options is a panel that lists accessibility features users can quickly turn on or off by pressing the keys: Option + Command + F5. To change the shortcuts displayed, do the following:
- Click the Apple menu.
- Open System Settings and select Accessibility.
- Find Shortcut on the right-hand panel.
- Tick and untick the options available according to preferences.
Keyboard Shortcuts
F 0-9 keys are located at the top of the keyboard, if the MacBook has a touch bar then will need to hold the fn key (bottom left corner) to display the F keys.
The control key is located at the bottom left corner with the symbol ^
Option keys are located at the bottom left or bottom right corner with the symbol ⌥
Command keys are located next to the space key with the symbol ⌘
1. Vision-Related Accessibility Features
- Enable/Disable VoiceOver: Command–F5
- Open VoiceOver Utility if VoiceOver is turned on: Control–Option–F8 or Fn–Control–Option–F8
- Enable/Disable zoom: Option–Command–8
- Zoom in: Option–Command–Plus sign (+)
- Zoom out: Option–Command–Minus sign (-)
- Invert colours: Control–Option–Command–8
- Reduce contrast: Control–Option–Command–Comma (,)
- Increase contrast: Control–Option–Command–Period (.)
2. Mobility-Related Accessibility Features
- Enable/Disable Sticky Keys: Press Shift button five times
- Enable Dictation: Press Control twice
Using a keyboard as a mouse:
- Switch between navigation of all controls on the screen, or only text boxes and lists: Control–F7 or Fn–Control–F7
- Move to the next control: Tab
- Move to the previous control: Shift–Tab
- Move to the next control when a text field is selected: Control–Tab
- Move the focus to the previous grouping of controls: Control–Shift–Tab
- Move to the adjacent item in a list, tab group, or menu. Move sliders and adjusters (Up Arrow to increase values, Down Arrow to decrease values): Arrow keys
- Move to a control adjacent to the text field: Control–Arrow keys
- Choose the selected menu item: Space bar
- Click the default button or perform the default action: Return or Enter
- Click the Cancel button or close a menu without choosing an item: Esc
- Move the focus to the previous panel: Control–Shift–F6
- Move to the status menu in the menu bar: Control–F8 or Fn–Control–F8
- Activate the next open window in the front app: Command–Grave accent (`)
- Activate the previous open window in the front app: Shift–Command–Grave accent (`)
- Move the focus to the window drawer: Option–Command–Grave accent (`)
Navigating menus with a keyboard:
- Focus on menu bar (necessary to use the following shortcuts): Control–F2 or Fn–Control–F2
- Move from menu to menu: Left Arrow, Right Arrow
- Open a selected menu: Return
- Move to menu items in the selected menu: Up Arrow, Down Arrow
- Jump to a menu item in the selected menu: Type the menu item’s name
- Choose the selected menu item: Return
Use Mouse Keys to move the mouse pointer:
- Move up: 8 or numeric keypad 8
- Move down: K or numeric keypad 2
- Move left: U or numeric keypad 4
- Move right: O or numeric keypad 6
- Move diagonally down and to the left: J or numeric keypad 1
- Move diagonally down and to the right: L or numeric keypad 3
- Move diagonally up and to the left: 7 or numeric keypad 7
- Move diagonally up and to the right: 9 or numeric keypad 9
- Press the mouse button: I or numeric keypad 5
- Hold the mouse button: M or numeric keypad 0
- Release the mouse button: . (period)
3. General-Related Accessibility Features
- Toggle Accessibility Options: Option–Command–F5
Additional Resources
To learn more about the accessibility features found on MacOS, visit the Apple website through the following links.
For Mac-specific features, click this link: https://support.apple.com/en-au/guide/mac-help/mh35884/mac
For more general information on accessibility, including features found on other Apple devices, click this link: https://www.apple.com/au/accessibility/